Sunday, January 31, 2010

Apple #436: Groundhog Day

I can’t believe I haven’t done an entry yet on groundhogs or Groundhog Day.

Typical groundhog.
(Photo from Construction Lit Mag)


Real Groundhogs
  • Groundhogs and woodchucks are the same thing.  They’re two different names for the same animal.
  • Groundhogs are a type of marmot.  They’re in the same family with squirrels, prairie dogs, and chipmunks.
  • Usually their fur is brown, but they may also be completely black.  More rarely, they may be all white (albino).
  • They're stocky animals with flattened heads and brushy tails. Their legs are thick and strong and because they spend much of their time digging, they tend to waddle when they walk.
  • They're slow runners, so they escape from predators (foxes, coyotes, dogs) by ducking into their dens.
  • If cornered, they can be fierce fighters. There are lots of stories about particularly feisty groundhogs fighting off dogs as big as Lassie.

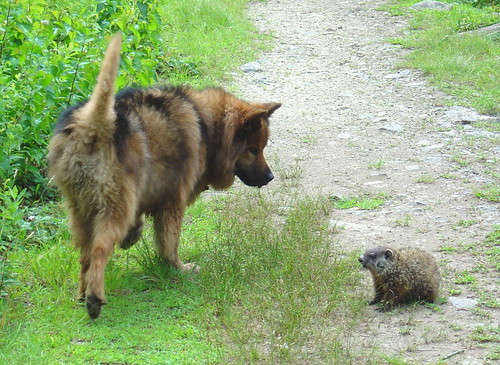
Groundhog and dog, squaring off. The groundhog won this round, perhaps only because the dog's owner corralled him and pulled him away.
(Photo from Hoarded Ordinaries)

    • They make several noises. They grunt when they're happy; when they fight, they make a series of huffing, then squealing noises; and when a predator is approaching, they let out a high-pitched, warbling, chattering sound called a shrill. (Wav files are from HogHaven.)
    • They also grind their teeth, and they make a sound like a low bark, but people don't know the purpose of this sound.
    • In the spring and summer they spend the majority of their time eating.  They have to store up enough fat in order to survive the winter, when they hibernate.
    • During these months, groundhogs hang out where they can find the most food, which happens to be in areas where woodlands meet open spaces, like fields, roads, or streams.
    • They eat grasses and dandelions and clover and alfalfa as well as fruits and occasionally tree bark. They also find a gardener's vegetables very tasty. Because they have to eat like mad in the summer and fall in preparation for winter, they have destroyed many a farmer's crops.
    • Another reason they have to keep eating is because their teeth don’t stop growing throughout their lives.  They have to keep chewing to keep their teeth worn down, or else their teeth will get way too big and possibly even kill them.
    • Groundhogs' feet have little paw pads, and on their back feet, they have a thumb-like digit which makes their paws look very similar to human hands, except with those extra pads and the long, sharp claws.

    I found some great photos of groundhog feet, but they have copyright notices all over them. So I can't show them to you here. But if you really want to see, and I recommend you look, check out this photo of a groundhog's front paw and this other photo of a groundhog's rear paw.

    The tracks a groundhog makes.

    • With those sharp claws, groundhogs can and sometimes do climb trees. They can also swim.  But usually they stay on the ground.
    • They have one den for summer and one for winter. The summer dens are relatively shallow, only 2 to 4 feet deep. They're built close to where they can find food, and often beneath structures like sheds or barns or garages.
    • Winter dens are dug in dry areas and are several feet deep. This is where the groundhogs go after the first frost to hibernate, so the dens have to be deep enough to keep the animals below the frost line.
    • While hibernating, the animal's heart rate plunges, and its body temperature is not much warmer than the temperature inside its burrow, about 39 to 40 degrees.
    • Winter or summer, the dens usually have two entrances, one where they come and go most often, and a second, smaller one where they can look out and see if the coast is clear or sneak out and escape a predator who's interested in the den.
    • Inside, the dens are lined with leaves and they are kept quite clean. There are rooms where the animals sleep and nurse their young, and a separate room which is essentially the bathroom. The groundhogs will wipe their feet before entering the den.


    Cross-section of a groundhog's den.
    (Drawing by Judith Moffatt, from Highlights Kids)

    • In the spring, as soon as he emerges from hibernation, the male starts looking for a female. He walks from den to den until he finds a female who's interested. He mates with her and stays with her until she's ready to give birth. Then she kicks him out of the den to have her babies.
    • She usually has about six cubs, which are born blind and helpless.
    • She keeps him away from the cubs and won't let her near them. So he goes back to wandering from den to den, looking for another female. But most of them have already had their cubs and they run him off, too.


    Groundhog Day
    • The legend, which seems to have come to the U.S. with settlers from Germany (and the Germans may have gotten the tradition from Roman conquerors), is that if a groundhog wakes from hibernation, sees its shadow, and returns to its den, there will be six more weeks of winter.
    • I’m not sure why Punxsutawney, PA became the center for Groundhog Day predictions, other than that a lot of Germans settled in Pennsylvania.  And the media might have had something to do with it.
    • Punxsutawney Phil has been predicting the weather since 1887.  It wasn’t until 1966 when the ceremony of Phil emerging from his burrow at Gobbler’s Knob was made public.  Since then, it has become an increasingly popular media event.
    • Now thousands of people descend on Gobbler's Knob, often as early as 3:00 in the morning or even the night before.  They wait outside in the cold until sunrise, around 7:00, when Phil makes his prediction.  I'm told there's a lot of drinking and shenanigans that go on in that 3 a.m. to 7 a.m. window. 
    • In Punxsutawney on February 2, the groundhog is brought out of his “home” in a tree stump.  He’s held up next to the president of the Groundhog Club and supposedly he speaks his prediction in “groundhogese.”  The Groundhog Club President then announces Phil’s prediction to everyone else.

    Punxsutawney Phil being held up by one of the members of the Inner Circle. That's what those guys in the top hats call themselves.
    (Photo from mypunchbowlblog)

      • Punxsutawney Phil almost always sees his shadow. Only 12 times out of the 109 years for which there are records did not see not see his shadow. In 1943, he didn't even come out of his hole. I don't blame him. There was a major war on that year.
      • He's been seeing no shadow more often lately. 6 of those 12 times he didn't see his shadow were in the last 10 years. Maybe Punxsutawney Phil knows about global warming too?
      • February 2 is what's known as a "cross-quarter" day, which means it's halfway between the winter solstice (the onset of winter) and the vernal equinox in March (the beginning of spring).  So by the calendar, February 2 is the dead middle of winter.
      • As it happens, groundhogs don't really end their hibernation until after Feb. 2. Depending on how far south or north they live, they may wake up a week later, or not until March.
      • What wakes them up is the change in the amount of daylight.

      I plan to continue my celebration of Groundhog Day by watching, again, the movie of the same name, starring Bill Murray and Andie MacDowell.  I don’t think her character is all that charming or desirable, and that sort of dampens the movie for me.  But the rest of it, particularly the fact that the day repeats over and over and over until he apparently gets it right, is genius.  And I love Bill Murray.  He lets the groundhog drive.  Maybe if I watch the movie enough times, I’ll get to run off with him.


      Okay, campers, rise and shine! Don't forget your booties cause it's cold out there today.

      It's cold out there every day.  What is this, Miami Beach?

      Not hardly. And you know, you can expect hazardous travel later today with that, you know, that, uh, that blizzard thing.

      That blizzard-thing? That blizzard-thing. Oh, well, here's the report! The National Weather Service is calling for a "big blizzard thing!"

      Yes, they are. But you know, there's another reason why today is especially exciting.

      Especially cold!

      Especially cold, okay, but the big question on everybody's lips...

      -- On their chapped lips.

      -- On their chapped lips, right. Do you think Phil is gonna come out and see his shadow?

      Punxsutawney Phil!

      That's right, woodchuck chuckers, it's

      [in unison] GROUNDHOG DAY!

      If you want to know how long Phil Connors actually lives Groundhog Day over again, The Movie Guy has come up with an estimate. The short answer: nearly 34 years.


      P.S. How much wood could a wood chuck chuck?
      • Though they can gnaw on bark, woodchucks don't actually eat that much wood, nor do they carry it around as beavers do. However, if they could carry it around, and if they used wood to fill one of their dens, they would have chucked about 700 pounds' worth of wood.

      Sources
      National Geographic, Animals, Groundhog (Marmota monax)
      Dr. Julia Spencer, Groundhogs.com
      Hinterland Who's Who, Mammal Fact Sheets: Woodchuck
      IMDb, Groundhog Day (1993)
      Groundhog Day, The Official Website of the Punxsutawney Groundhog Club
      Jason Patton's Groundhog Day page

      Thursday, January 28, 2010

      Little note

      Just updated my entry about J. D. Salinger with the latest news.

      Apple #435: Sweater Pills

      This morning I got out one of my old favorite sweaters that I haven't worn in a long time.  As soon as I unfolded it, I remembered why: it's covered with hundreds of little sweater pills.  The pills make it look old and raggedy and generally unappealing.

      But I really like this sweater.  It's a very soft wool, it's a darkish gray color that sometimes I am just plain in the mood to wear, and I've had it so long, it's like a good old friend.  So I spent too much time this morning de-pilling it.  I thought I'd gotten off most of the pills, but when I got to work where the light is brighter, I saw that there were many more I had missed.  Aggravating.


      A few pills sticking up from this person's gray sweater. They make a nice sweater look icky.
      (Photo from Lark About)

      • All sweaters are made of some sort of fibers that have been twisted together to form a thicker strand, or yarn.
      • Some of those individual strands that make up the yarn will poke out from the yarn, like lots of little hairs standing up.
      • The technical term for the little hairs is "short staple fibers."  When a sheep is sheared and the wool is carded, the fibers are gathered into groups called staples.  The fibers within the staple are considered to be more or less equal in length, but in reality, some of the fibers are slightly longer or shorter than others.
      • When the wool is spun into yarn, those fibers of varying lengths -- usually the shorter fibers -- will poke out from the sides of the yarn.  That's how you get "short staple fibers" or a lots of little hairs standing up.
      • So now that yarn has been made into a garment -- a sweater or a poncho or what have you.  Those little hairs that were sticking out of the yarn are now sticking out from your sweater.
      • When you rub something over the fabric, with many types of yarn, the little hairs aren't strong enough to withstand the friction and they'll break off.
      • In other cases, though, the little hairs won't break.  Instead, they hang on and the friction rubs those little hairs together. After enough time, the little hairs will wrap around each other and form a ball, or a pill.
      • The types of fibers that tend to poke out but don't break off with friction -- the ones that get pilly -- are synthetic fabrics like acrylics, or softer wools like merino and cashmere, especially if the cashmere is inexpensive.
      • Because the pilling action takes place with friction, the pills tend to accumulate in places on your sweater where friction happens the most: under the arms, where the strap of your purse or backpack rubs, where you cart your child around on your hip all day, where the monkey bounces on your back as you walk, etc.
      • So how do you get rid of sweater pills?
      • But most of us are not spinning our own yarn and knitting all our sweaters ourselves, and we're stuck with the fact that our sweaters are developing pills.
      • Lots of people say that hand washing the sweaters inside out will help prevent pills.  Other people say dry cleaning results in fewer pills.  But I have only ever dry cleaned this sweater according to the instructions, and it still made pills like mad, so obviously these suggestions don't solve the problem.
      • The only other thing I can do is to remove the pills after the fact.


      Pills and fuzz that I removed from my sweater this morning. That's a lot of fuzz.
      (Photo by the Apple Lady)

        • There are a lot of different products available to remove sweater pills.  The fact that there are so many different types of products suggests to me that none of them really does the job as completely as we'd all like.  Here is a list of those pill-removing products.
        • Electric shavers -- no, I don't mean the face-shaving kind, I mean the clothes-shaving kind.  The blade is behind a metal grid pocked with holes.  As far as I can tell, when you run the shaver over the fabric, the pills pop into the holes and the blade behind the grid slices them off.  Most of the shavers include a receptacle to catch the shorn pills.  In general, lots of people who've tried clothes shavers say they like them, though some versions seem to be cheaply made and don't work very well. Depending on the variety, they may run on batteries or be plugged into the wall.  They range in price from el cheapo $3 to fashionably designed $50.


        This is one kind of clothes shaver, the Remington RPFS-100 Fuzz Away Fabric Shaver.  It sells for $12 on Amazon and it got 4 out of 5 stars from people who've bought one.

          • Sweater Stone -- pumice stones with a label stuck to them.  Pumice stones naturally have pits and sharp edges, which grab onto the short fibers and cut them off.  I've never tried one of these for this purpose, but people who have say that the stones crumble as you use them so you get crumbly bits all over your sweater.  You can brush those off, but that means the stone will eventually need to be replaced.  Pumice also smells like sulfur, so after using a pumice stone on your sweater, it'll probably smell like sulfur too.  So you'll want to use a Sweater Stone before hand washing or dry cleaning, not after.

          Sweater Stone, available for $4.99

          • Sticky lint roller -- I've tried these in the past and though they do a good job of removing lint from lighter fabrics like cotton shirts or twill trousers, I don't think they're strong enough to deal with heavier material.  Fuzzy fabrics tend to gum up the works before it can pull off the pills. They also tend to tug on more fibers and leave them sticking up, which will result in yet more pills soon enough.
          • Masking tape -- you can wrap some masking tape, sticky side out, around your palm and pat the fabric so that the tape picks up unwanted stuff.  Like the sticky lint roller, this works well enough for lint but usually isn't up to the job of pill removal. 
          • Sweater comb -- this is what I used.  It's a plastic semi-circle and the flat edge of it has a very rough criss-crossed surface.  Briskly comb this rough edge over the sweater and it will collect the pills. I had to stop frequently and pick off the wads of fuzz and it took quite a while, but it did pull off a lot of the pills.  It's possible that, like the sticky lint roller, it also combed up more short fibers and left the fabric susceptible again to further pilling.  Or I may have only missed a lot of them.  

          The D-Fuzz-It comb.  One user found it too hard on her clothes.  When I used a non-brand-name sweater comb like it, it didn't damage my sweater but rather I had to go over and over the same territory and I still missed some of the pills.
          (Image from Knitter's Review)

          • One person also tried a D-Fuzz-It comb, which is essentially what I used, on various hand-knitted fabrics, and she reported that the comb pretty much pulled the yarn apart. I would say reserve this tool for sturdier, manufactured sweaters.
          • Disposable razor -- people like this solution because it's cheap and readily available.  But you do have to be careful you don't accidentally cut the fabric.  People say you have to go slowly and take your time, but that it works.  These razors get dull pretty quickly, but I don't know how quickly they turn dull when used on a sweater.
          • Pick them off by hand -- this is the most obvious and least damaging, but also the most time-consuming method.  If you've got some OCD anxiety to burn, this might be the best bet for you.
          • One sweater owner used a combination of pumice stone, sticky lint roller, and hand-pulling.  She doesn't say how long it took.

          Some of these pill-removal methods are more dramatic than others, but all of the methods remove fibers from your garment.  Which means you can't keep removing pills forever because eventually you will have scraped away so many pills you will have thin spots instead of pills.

          Yes, I know I'll need to say good-bye to this sweater someday.  But I think I'm going to try my sweater comb on it again and keep it a while longer yet.


          Sources
          M. E. Williams, DIY Life, Why fabrics pill, December 28, 2007
          Llyn Payne, BellaOnline, Pills!
          Marjorie Colletta, BellaOnline, Removing Pills on Sweaters
          Vintage Vixen, Save Your Sweaters! How to Prevent Pilling & Pulling
          Knitter's Review, Knit Tool: D-Fuzz-It Sweater and Fabric Comb
          Lifehacker, Use a Disposable Razor to Remove Sweater Pills

          Monday, January 25, 2010

          Apple #434: Popcorn

          I've been liking the popcorn lately.  I don't mean the microwave kind, I mean the kind you heat up in a pot and pop yourself.  Melt the butter and pour it on top, add the salt, and yum.


          Bowl of crunchy salty deliciousness that is popcorn.
          (Photo from Start Up Blog)

          • There are four types of corn that are the most common:
          1. sweet (the kind you eat on the cob)
          2. field
          3. flint (a.k.a. Indian corn)
          4. popcorn
          • Only popcorn will pop.
          • The reason that popcorn does pop and the others don't is that its hull, or outer coating, has the right thickness to burst open when heated.
          • Inside the hull is a soft circle of starch.  Inside that circle is a drop of water.   
          • I find this espeically interesting, since the way popcorn is harvested, it's allowed to dry in the field.  It isn't even picked until the husks are dry and the kernels are hard.  Then it's packaged and shipped and stored in the grocery and then on your self.  But still, that drop of water remains in the kernel.  

          Diagram of a kernel of corn.  The pericarp is the hull.  The germ, I believe, is the starchy part, and the necessary drop of water is inside there.
          (Diagram from Democratic Underground)

          • When the corn is heated, so is that water deep inside the starch.  The starch begins to soften, and the water expands.  At 212 F, the water turns to steam.  You'd think the kernel would pop here, but no.  The suspense continues. The temperature rises still higher and the steam is going berserk in there, and the pressure inside the starch -- which is now gelatinous -- continues to build.  
          • When the pressure inside the grain hits 135 pounds per square inch, then the hull bursts open.  The steam inside the kernel is released, and the soft starch spills out and cools as soon as it hits the air to form that oddball shape we all know and love as popcorn.

          Step by step photo of a kernel of popcorn popping
          (Image from the Popcorn Board)

          • Popcorn was first grown in Mexico.  It was a big part of Aztec culture.  They used popcorn in ceremonial headdresses that they wore during special dance ceremonies, and they made it into necklaces and put them on the statues of their gods.
          • The Aztecs's word for popcorn was "momochitl."  The Incas in Peru apparently liked popcorn too.  They called it "pisancalla."
          • The Iroquois who lived along the Great Lakes also made popcorn.  They served French explorers who visited them popcorn soup and popcorn beer.
          • In fact, lots of native people throughout the Americas grew and ate popcorn.  Somehow -- no one seems to be sure how -- people in China and India and Sumatra started growing popcorn after the Aztecs did but before any Europeans showed up in the Americas and found out about popcorn (among other things).
          • European colonists liked popcorn so much they ate it with sugar and cream for breakfast.  Technically, this makes popcorn the first puffed breakfast cereal.
          • In more recent history, popcorn first became popular in the U.S. when corn was plowed on a widespread scale in the 1800s.  
          • But it really took off during World War II when sugar was scarce.  People ate more popcorn as a substitute for sweets, and it became the snack to eat at the movies.

          To this day, popcorn remains the quintessential movie-going snack.
          (Photo from Your Big Fat Boyfriend)

          • In the 1950s when people stayed home to watch TV instead of going to the movies, people also ate less popcorn.
          • But then, with the advent of microwave popcorn in the 1990s, it surged back to popularity again.
          • The very first use of microwave heating was to make popcorn.  In fact, popcorn was what the microwave's developer, Percy Spencer, used for many of his initial tests.  This took place longer ago than you might think: the 1940s.
          • I suspect popcorn is one of those foods about which nutritionists would say, "It's not the popcorn, it's what we do to it that's bad."  I'll show you what I mean.
            • Popcorn, air popped, 1 cup: 31 calories, 0.4g fat
            • Popcorn, oil popped, 1 cup: 64 calories, 4.8g fat
            • Pop Secret Butter microwave popcorn, 1 cup: 960 calories, 64g fat
            • Movie popcorn, medium (15 cups), no butter: 951 calories, 58g fat
            • Movie popcorn, medium (15 cups), plus butter-like liquid: same as above plus 130 calories, 14g fat per pump
          • So actually, movie popcorn without butter has fewer calories and fat than microwave popcorn.  But once you add the hot liquid butter-like deliciousness, it's all over.
          • If you want to pop the corn yourself (I think it tastes the best this way), here's how.  It looks like a lot of steps, but I'm being super-specific for those youngsters who may never have had popcorn at home any other way except microwaved.
            • Use a 3- to 4-quart pot with a lid
            • Heat the pot and pour in about 1/3 cup of vegetable oil per cup of kernels.  If you're making enough for one person, that's about enough oil to make a sizable circle on the bottom of the pot, but it won't cover the entire floor of the pot.
            • As far as what oil to use, I've tried corn oil and olive oil.  Corn oil works a little better because it's heating temperature seems to be closer to that of the kernels.
            • Get the oil good and hot. When you see pinpricks starting to form in the oil, that's a sign that it's ready to go. If you want to test it first, drop a single kernel or two into the oil.  When that test kernel pops, pour in the rest of the kernels.
            • About one ounce of unpopped kernels yields one quart of popcorn.  In other words, it doesn't take as many kernels as you might think to make a big bowl of popcorn.
            • Put the cover on and give the pot a shake to coat the kernels with oil.  
            • You're supposed to keep the lid slightly ajar to allow the steam to escape, but most pot covers don't make a tight seal so that happens anyway without even trying.  But if your popcorn turns out soggy, that's because not enough steam escaped during the popping process.

          I've seen several pots like this with fancy lids and handles which I don't know what the heck they're for.  That pot you boil spaghetti in -- get that and get out the lid.  That's all you need.
          (Photo posted at Soda Head)

            • I like to keep shaking every few seconds or so to make sure the kernels don't get too lazy in there and burn instead of popping.
            • You'll hear the kernels pop, and you'll also be able to feel the impact of them hitting the inside of the pot.
            • When the pace of the popping slows, you can turn off the heat and take the pot off the stove. Don't remove the cover though, because more kernels will still pop in there.
            • I like to continue shaking the pot all the way through this process, again, to avoid burning any of the popped kernels.
            • After about 30 seconds to a minute longer, the ones that are going to pop probably have, and you can pour them out into a bowl.
            • Add butter & salt to your pleasure.
          • There always seem to be some kernels that don't pop.  I thought this meant they were old or stale or something, but all it means is the drop of water inside the kernel has finally dried up.
          • To re-hydrate the unpopped kernels, save them until you have about 1.5 cups worth.  Then put them in a jar that has a lid with about one teaspoon of water, and screw on the lid.  Make sure it's airtight.  Give the jar a few shakes every couple minutes or so until the popcorn has absorbed all the water.  Then let store them in that jar for about four or five days.  They should be ready to pop.  
          • You could also make popcorn by any of these old methods used by native and colonial Americans:
            • Put it on hot stones surrounding a fiercely burning campfire.  When the popcorn explodes and shoots off in all directions, you have to dive for it to catch it and eat it.  Makes a great game.
            • Put it in an earthen pot and put the pot in a hole of heated sand.
            • Shove a stick through a cob of popping corn and pop it while it's still on the cob.
            • Put the kernels in a mesh basket with a long handle and heat it over an open campfire.
            • Make a closed cylinder of sheet metal, pour the kernels into that, and turn it on an axle in front of the fireplace.
            • Fill a kettle with lard and pour the kernels into the lard.  Skim kernels off the top of the lard as they surface during popping.
            • String the kernels on a tassel (this has got to take some serious needle-work), and boil the tassels in oil.
            • Pour it into 8-foot wide clay pots called ollas and heat the ollas in great mound-like ovens.

          Some companies that make themselves look old-timey, like this one, sell popcorn on the cob.  This company, Victorian Trading Company, will sell you five cobs for $19.95.  Plus shipping & handling, I'm sure.


          Of course there's also Jiffy Pop.  Which, though it looked exciting, unfortunately never worked as well as the regular old pot on the stove.
          (Photo is supposedly somewhere on this chat page from Free Republic)


          Sources
          The Popcorn Board, Encyclopedia Popcornica
          Iowa State University, Horticulture & Home Pest News, Growing, Harvesting, and Storing Popcorn, July 21, 2000
          essortment, What is the history of popcorn?
          Rosson House Museum, Popcorn in 19th and 20th Century America
          Linda Stradley, What's Cooking America, History and Legends of Popcorn (she claims copyright to a lot of information that's widely available elsewhere)
          Paramount Concession Suppliers, Popcorn History
          Calorie Count, popcorn
          Your Big Fat Boyfriend, Date Smart: At the Movies

          Friday, January 22, 2010

          Apple #433: Sunlight

          The past few posts have seemed to be all about rain, so I thought I'd brighten things up around here.

          Also, a faithful Daily Apple reader wanted to know about sunlight and vitamin D and whether the reduction in both during the winter contributes to the fact that a lot of people tend to get sick more often in the winter.


          Sunlight. We all need it.
          (Photo from Skirt! Raleigh)

          • The sun always rises in the east and sets in the west.  This is true no matter where you are on the planet.
          • This may make you say, "Duh," but someone told me just the other day that an adult friend of his recently realized this.  It was a new and startling revelation to him. So in case anybody else missed that fact, here it is for you.
          • The sun emits light and heat, both of which we need to survive and be comfortable here on Earth.
          • Nearly all life on earth depends on the sun for fuel.  Plants, bacteria, algae, all these things are autotrophs, meaning that they produce their own food. Nearly all of them require sunlight in order to manufacture that food.
          • Heterotrophs, which are organisms that rely on others for food, are primarily animals like us.  We rely on other animals and plants for our food.  So not only do we need sunlight to keep us warm, we need it to grow the food that we need to eat.
          • The sun does not "burn" as a fire does, leaving smoke and ash behind.  What's really happening is that deep in the very core of the sun, hydrogen atoms get smashed together and when that happens, they become helium.  

          What the sun really looks like.
          (Photo from NASA)

            • It's really hard to change anything at its most basic level, yet that is what the sun does all the time.  This process, naturally, is enormously powerful, and every time it happens incredible amounts of heat and light are emitted as a byproduct.  
            • The heat and light are so strong, they flow up from the inner core through the body of the sun which is an enormous, boiling ball of gas, and then out to the photosphere, which is the part of the sun that we can see.

            Diagram of the sun and its layers. The core is where the fusion happens; the photosphere is where we see the heat & light being emitted.
            (Image from NASA, sourced from Morehead Planetarium at UNC)

            •  Here's an indicator of how powerful that energy is: the sun is 93 million miles away from us.  If we drove 93 miles per hour -- we'd need to get a better car first -- it would take us more than 100 years to get there.  Yet it takes the sun's light only 8 minutes to make the trip here.

            Kind of hard to look directly at this, isn't it?  And this is only a picture.
            (Photo from Forecasting Kitsap)

              • Sunlight contains all kinds of different types of light.  These types are classified by their wavelengths.
              • The wavelengths that we can see are grouped into a category called visible light.  This is only a portion of the total light coming from the sun.


              Diagram of the types of light present in sunlight.  The rainbow-colored portion represents the wavelengths that we can see.
              (Diagram from DermIS)

              • Some of the wavelengths in ultraviolet light are harmful.  UVC is very harmful, but our atmosphere absorbs all of that.
              • Some of the UVB and UVA wavelengths are also blocked by our atmosphere (clouds, basically).  These are less harmful than UVC, though they can damage our skin cells.  Ultimately, that's what causes skin cancer.


              Same diagram, showing which types of wavelengths are blocked by clouds.
              (Diagram from DermIS, modified by the Apple Lady)

              •  UVB radiation, which has shorter wavelengths, is potentially more damaging than UVA.  This is why most sunscreens have UVB radiation protection.
              • For a long time dermatologists thought UVA radiation wasn't harmful.  But then they realized that though UVA has less energy than UVB, it penetrates deeper into human skin.  It is these wavelengths that are responsible for skin aging, and with enough exposure, they too can cause skin cancer.
              • So, UVB rays are bad, right, and you should never expose yourself to it?  Of course it's not that black and white (har har).
              • One of the vitamins that's really important to your health is vitamin D.  You need vitamin D to absorb calcium, which makes your bones grow and stay strong.  Because of its essential connection with calcium, vitamin D is also very important in preventing osteoporosis.
              • Vitamin D has been shown to help prevent heart disease and cardiovascular issues like high blood pressure and diabetes.  It's also been shown to be beneficial in preventing various types of cancer including breast, colon, and prostate.  People with darker skin need more vitamin D than fair-skinned folks, but they don't often get as much as they need.  This is one of the reasons why people with dark skin have a higher incidence of prostate cancer. 
              • So your body really needs that vitamin D.  Got it.  What's pretty amazing is that your body makes it all on its own when exposed to sunlight. (That's kind of autotrophic of our bodies, isn't it?)  

              Here's a very quick overview of the process by which your body uses sunlight to produce vitamin D.
              (Diagram from Be Better If You Want)

              • But not just any wavelength in sunlight does the trick, it's the UVB wavelengths.  The same ones that can give you skin cancer.
              • The minimum amount of vitamin D your body needs per day is 200 international units (IUs) if you're under 50. If you're over 50, you need between 400 and 600 IUs.  Many nutrition experts say that recommendation is way too low. 
              • Going out into the summer sun at midday for 10 minutes is enough to give you 10,000 IUs of vitamin D.  This will give you more than you need, and since vitamin D is stored in body fat, you don't actually need to be out in the direct sunlight every single day.  Health experts say that "sensible sun exposure" should be between 5-30 minutes of direct sun day two or three times a week.  

              This looks like a good place to get your sunlight / vitamin D requirement.
              (Photo from Bitter Cup of Joe)

              • The amount of time you spend in the sun depends on your skin color.  If you're fair-skinned, 5-10 minutes should do it.  If you're darker skinned, 30 minutes may not be long enough.
              • It's important that it's direct sunlight.  If the sunlight is filtering through glass, it doesn't work.  You have to be out under the sun, not in the shade, not in the clouds, and your skin must be exposed and not shielded with sunscreen, for that amount of time.
              • Remember, though, all things in moderation.  These are UVB rays we're talking about.  You need enough to give you that vitamin D, but not so much you'll get skin cancer.  Use your noodle and don't bake yourself. 

              It wouldn't take long at all under this midday sun to give you more than enough vitamin D to last you a while.
              (Photo from Rick O! at Flickr)

              • If you live north of 42 degrees N latitude (draw a line across the US from Boston to Northern California) or south of 42 degrees S latitude, you're not going to get enough of that direct sunlight from November through February for your body to make the vitamin D that it needs.
              • You might also suffer from seasonal affective disorder, and you may be more likely to suffer from insomnia and depression from Nov-Feb, all because of the shorter days and increased cloud cover during this time.  And because of the related drop in vitamin D.
              • So, are you out of luck in the winter time?  Do you just have to suffer in a vitamin D-less world?  Nope.  You can also get vitamin D from our animal friends.  
              • Oily fish like tuna and salmon and mackerel are high in vitamin D.  Cod liver oil is really the best food source for vitamin D (bleah).  You can also get small amounts of vitamin D from beef liver, sardines, egg yolks, and cheese.  Surprisingly, some mushrooms also contain varying and small amounts of vitamin D.  Food manufacturers have added fairly decent amounts of it to other foods like milk and breakfast cereals and even orange juice.

              All good sources of vitamin D.
              (Photo from Cheap Ethnic Eatz)

              • But vitamin D that comes from foods or supplements isn't utilized as easily by your body.  So nutritionists recommend that if you're going to get your vitamin D this way rather than by sunlight, you should get 2,000 IUs of it per day in the winter.  
              • I didn't see anything from the official health people about the lack of vitamin D contributing to colds and flu.  But vitamin D deficiencies have been shown to be a factor in seriously bad autoimmune diseases like multiple sclerosis.  So I suppose it's possible that not enough vitamin D could compromise your immune system in other ways and leave you more vulnerable to colds and flu.

              Here's some more sunshine for you.
              (Photo from civoz on Flickr)


              Sources
              Challe Hudson, Sunlight, Sun Bright, Morehead Planetarium, University of North Carolina
              Absolute Astronomy, Sunlight
              NASA Astronomy Picture of the Day, December 12, 1998
              National Institutes of Health, Office of Dietary Supplements, "Dietary Supplement Fact Sheet: Vitamin D"
              Deborah Kotz, "Time in the Sun: How Much Is Needed for Vitamin D?" US News & World Report, June 23, 2008
              MF Holick, Sunlight and vitamin D for bone health and prevention of autoimmune diseases, cancers, and cardiovascular disease (Abstract), American Journal of Clinical Nutrition, December 2004

              Sunday, January 17, 2010

              Apple #432: Where Birds Go to Die

              OK, I know this seems like a thoroughly depressing topic and thus antithetical to the spirit of the Daily Apple.  But it was a very good question, posed by a faithful Daily Apple reader.

              In a comment to the previous entry, Birds in the Rain, loyal Apple reader Pam asked,
              Another thing I've always wondered about birds: There are so many in the sky but you rarely see a dead one on the ground. Where do they go to die?

              I have wondered this myself.  Those rare occasions when I have seen a dead bird, I found it really disturbing, perhaps because it's something I encounter so seldom.  Maybe also because it's a bird, something that's supposed to fly and be light and airy, but no, there it is dead on the ground.

              OK, on with the answer.


              A little songbird, in this case, a chickadee.  Little birds like these may be the best at hiding themselves away from prying eyes.
              (Photo from Advanced Poetry Management)


              As most creatures do, when birds are feeling ill, they go to a secluded, out-of-the-way place to hunker down and try to get well.  They also tend to segregate themselves from the flock.  This secluded spot might be a hole in a tree, or it might be tucked away under thick grasses -- places where most humans, at least, won't see a bird hiding out.

              Unfortunately, predators (cats, rats, foxes, ferrets, etc.) like to poke around in those secluded, tucked-away places.  Finding a weak, sick bird all by itself with none of its fellows around to protect it, the predator enjoys an easy meal on the spot.  The predator will eat just about every bit of the bird there is.


              Cats like to eat birds.  That's how it is.
              (Photo from the Black & Orange Cat Foundation)


              Many predators may also take the sick or injured bird home to its young, and they'll consume most of it at their house.  The predators' homes also tend to be tucked away from us people, so we don't see the bird-meal in action, nor do we see any of the leftovers.

              In far fewer cases, a bird might be killed out in the open -- that is, in places where we humans regularly come and go.  In these instances, the bird has usually been killed by a domestic cat or perhaps has run into some human-built structure.

              Wherever and however the bird dies, there will still be at least some of its body left on the ground.  But in very short order, that gets eaten, too.  Bird scavengers can be all sorts of creatures, from raccoons to crows to cats to beetles to ants to bacteria to fungi.  Regardless of who is involved in it, the process of carcass removal is very fast.

              This all sounds rather unpleasant, but let me tell you a story.

              Once upon a time, an empty house next door to where I used to live had a roach problem.  I liked to sit out on my porch at night, but then I'd see those things crawling all over the next door steps.  So I'd go over there and smash the heck out of them and then go sit back down on my porch.  Within minutes, reconnaissance ants would start showing up and inspecting the carnage.  After a few more minutes, there'd be a stream of ants all around the smashed bugs.  By the light of street and porchlight, I watched those ants dismantle the roaches bit by bit and cart the bits away.  It was slow work and I got tired before the ants did.  Next morning when I came out, there was not one single sign that any bugs had been there at all.  It didn't matter how many roaches I'd smashed, the steps the next day were always as clean as if somebody had scrubbed them with soapy water and a sponge.  I was downright impressed that those little ants could do so much work so quickly and so thoroughly.  I mean, there was not a speck left behind.

              The point is, everybody's got a job to do. Some jobs -- like singing pretty songs and flitting around eating bugs -- seem more palatable to us than others.  But if those ants and raccoons and fungi didn't come and clean up the dead birds and animals, we'd have a massive and stinky mess on our hands very fast.  So be glad they do such a good job, especially since it's not a job we ourselves would like to do at all.


              The ant. This one's a pavement ant.  Mightier than you might think.
              (Photo from Pest Control Shark)


              I promise I'll have a cheerier entry for you next time.

              Sources
              Ask Yahoo! Where do birds go to die? September 21, 1998 
              Bird Ecology Study Group, Where do birds go when they die? May 12, 2008
              University of California, Ask it! - birds and bees, May 20, 2008
              WildBird on the Fly, Where do dead birds go? May 27, 2008
              Royal Society for the Protection of Birds, Ask an expert, Where do birds go to die? June 2, 2008

              Friday, January 15, 2010

              Apple #431: Birds in the Rain

              Forgot until late tonight that I meant to make a new post.  Since I didn't leave myself much time, I'm going with a short, quick one, a question that's puzzled me for quite a while now:

              Where do birds go when it rains?  They seem to disappear when it's raining.

              A corollary to this: my mom has a saying, if you see a bird out during a rainstorm, you know it's going to rain all day.  This seems to be true, but why?


              A downpour in Moscow, Russia.  The rain is really coming down, and there are lots of trees and leaves. But where are the birds?
              (Photo by Charles Ganske from Russia Blog)

              • Mainly, they take shelter on tree branches under clumps of leaves.
              • Their feet have special muscles that default into a clamped position, so when they land on a branch, their toes "rest" in a way that holds them to the branch. This is what keeps birds from falling while they're asleep and it enables them to hang on when it's windy.
              • If it's too windy as well as rainy, they stay out of the trees and duck under thick, leafy bushes for shelter.
              • Birds that live on grassy plains will huddle under thick bunches of grass.
              • Birds who live near mountains will take shelter in a cave or under overhanging rocks.
              • Birds such as woodpeckers who live in holes in trees go hide out there.
              • If there's no place for them to go to stay dry, they tough it out in the wet. 

              A pair of goldfinches waiting out the rain
              (Photo by It's Greg, sourced from Purple Wren)

              • I suppose if the rain is steady enough, they've already gotten soaked so they figure what's the point of hiding out somewhere, better go get food for the day.  So this may be why my mom's saying about birds in the rain seems to be true.

              This bird is quite the opportunist -- taking shelter and getting a bite to eat.
              (Photo from Wild Birds Unlimited)

              • Most species of birds have feathers that can handle rain.  Their feathers are able to shed enough rain so it won't penetrate their feathers through to their skin. (Here's a link to a photo that will show you how the water beads up on feathers. This particular bird is a northern gannet [copyright Arthur Morris/Birds as Art].)
              • If it's going to be a super-bad storm, birds can tell it's coming. They have a little receptor in their middle ear called the Vitali organ, which is very sensitive to changes in air pressure.  When they get the signal that the air pressure is plunging, they take off and fly like mad ahead of the storm.
              • Some birds can't fly that fast.  If they're also not able to hide successfully from the big monster storms like hurricanes and tornadoes, they get sucked in. Sometimes land-dwelling birds get blown out to sea or vice versa.
              • The eye of a hurricane can become, effectively, a bird cage, where birds that have been sucked into the storm are tooling around, waiting until it's safe to fly out of it.  
              • Often, by the time the big storm subsides, the birds have arrived someplace very far from their original stomping grounds.  
              • Birders like to go looking for unusual species after big storms because sometimes they find birds that normally live way out over the ocean walking around on land, sort of dazed, looking for home.

              This stunned little bird is trying to dry out after Hurricane Ike in Houston.  The person who took this picture said the bird didn't try to hop away or  even move when he approached with his camera.
              (Photo by chrisamiller on Ask Metafilter)

              • After it stops raining, birds puff and fluff up their feathers to shake off the rain. 

              Sources
              Birding.com, How Birds Stay Safe During Hurricanes 
              April Holliday, WonderQuest, Birds huddle under leaves when it rains 
              Lisa Shea, Birds Surviving Hurricanes and Storms 
              Wild Birds Unlimited, Can Birds Predict the Weather?

              Sunday, January 10, 2010

              Apple #430: Windshield Wiper Noise

              I've had a few suggestions from people lately for Daily Apple topics, and I will get to them, but first I must talk about this one because it's been driving me nuts. What makes windshield wipers make those horrible farting sounds and how do I get it to stop?

              • The really annoying noise that windshield wipers make is sometimes referred to as "chattering." This happens when the blade doesn't glide smoothly over the windshield.

              I found a video so you could hear what chattering sounds like (I also love this guy's expression as the wipers are making the noise). You can keep watching to see how he fixes it. But that's not the only reason wipers can chatter, so there are other things you may need to do if your wipers are making that sound.


                • Besides the cause described in the video, chattering may be caused by the rubber blade hardening or else developing kinks or cracks or bumps that somehow keep it from contacting the surface of the windshield smoothly all across its arc.


                Things that can screw up the rubber blade:
                • Solvents not designed for use on a windshield can swell or even disintegrate the rubber blades. Many people say that RainX can fall into this problematic solvent category.
                • Dirt and oil can build up on the blades. Solvents or waxes on the windshield can fix the dirt there.
                  • Hot weather can warp the rubber.
                  • Snow or especially ice that builds up on the windshield can cool and almost "freeze" the rubber.
                  • Additionally, if ice builds up while the car is off and then you turn on the wipers, the wipers will have to push themselves out of their ice-packed position, which can cause damage, and then they will scrape over the bumps and knobs of ice on the windshield, and that can damage the blades, too.
                  • The wipers simply wear out. On a car that's kept in a garage, windshield wipers should last about a year. If the car is kept outside, the wipers won't last that long.

                  Things to do to fix the problem, or prevent it from happening in the first place:
                  • Clean off your snowy and icy windshield before turning on the wipers. (Yeah, I've been hoping the wipers could do this work for me. All right, I'll do it myself. Grumble, grumble)
                  • Any ice that's stuck to the blades or any part of the wipers, clean that off too.
                  • Clean the blades with vinegar. This will help remove the solvents, dirt, etc. One car owner says he cleans his blades with Stridex pads. Somebody else recommends dish detergent. Yet another person says he used lighter fluid.
                  • One common recommendation is to clean the blades with rubbing alcohol. But some people say that alcohol is too harsh and may damage the blades. These folks recommend purchasing a solvent designed specifically for cleaning wiper blades.


                  303 Wiper Treatment is one of the specialty cleaners recommended by one particular driver.


                    Stoner's Invisible Glass is designed to clean windshield glass, but people say it works on wiper blades, too.

                    • People definitely recommend, no matter what liquid cleaner you chose, applying it with a microfiber cloth.
                    • If cleaning the blades doesn't do the trick, perhaps you've still got gunk on your windshield. You can live with it, or you can do what some car enthusiasts do, which is to "clay" the glass. This involves cleaning the glass really well, then using a piece of soft clay that looks almost like Silly Putty and rubbing it over the windshield. I'm giving you a really brief overview here to give you an idea of the work involved. Complete instructions for how to clay a windshield are available at properautocare.com.
                    • But maybe the problem isn't dirt on the wipers or on the windshield. The problem could be due to the fact that the wipers are not contacting the windshield properly. I've seen all sorts of suggested fixes for this, too.
                    • The first suggestion is to follow the advice given in the video about the mini Cooper and make sure your blade is contacting the glass perpendicularly. But as I've noted, that's not the only advice I found.
                    • Another guy says to bend the wiper arm slightly inward so as to increase the curve of the wiper.
                    • Others say to adjust the tension on the wiper arm.
                    • One tool-less way to do this is to turn the car on, turn on the wipers, and then turn off the car when the wipers are in the upright position (perpendicular to the bottom of the windshield).


                    These wipers are just about vertical. Of course you wouldn't want to try to clean the wiper blades in a downpour like this.
                    (Photo from eihcter's blog)

                    • Grasping the wiper at the point where the blade connects to the arm, pull the wiper away from the windshield about 2 inches, then let it go so it snaps back to the windshield. Do this a couple of times per blade.
                    • If that doesn't work but you still think the wiper isn't contacting the windshield correctly, there is a more involved way to adjust wiper arm tension. Again, I've seen lots of different instructions about how to do this and they all sound slightly dotty in place. Here is one set of instructions that seems to be the most helpful.
                    • Of course you can also try replacing the wipers. If they're six months to a year old, that may be the best solution.
                    • If you need to replace one wiper, replace the other one with it. Because the second one is bound to wear out soon afterward anyway, and it's best to have an equally matched set.
                    I have the feeling that on my car, I'll need to adjust the wiper arm and clean off the blades. I'm going to give both a try and see if that takes care of it.


                    You might also be interested in: How do Day/Night Rear-View Mirrors Work?


                    Sources
                    Auto Zone, Windshield Wipers and Washers, page 2 of 3
                    Jeep Forum, Windshield Wiper Chatter Fix
                    BenzWorld, Windshield Wiper Blade Chatter
                    ToyotaNation, Windshield Wiper Chatter
                    Autopia.org, Windshield Wiper Chatter . . . ?
                    Autohaus AZ, Replacing Wiper Blades Regularly Saves Lives & Windshields
                    Jamak Global Wipers, FAQ and Troubleshooting

                    Saturday, January 2, 2010

                    Apple #429: Leis

                    So the Obamas went to Hawaii for their Christmas vacation, and I was looking at a news article about that. The article had photographs of each family member being given leis, as is tradition in Hawaii, as soon as they arrived.


                    Sasha and Malia and Michelle Obama with their leis. I bet the secret servicemen in the background wish they could have gotten leis, too.
                    (Photo by Samad/AFP/Getty, from the New York Daily News)


                    I've never been that interested in leis, I think because I have only ever experienced the fake cheap plastic ones that don't even look like flowers. But when I saw these particular leis, they looked really enticing. I think maybe because I was outside in the snowy winter cold yesterday and there were barely any living things out and moving. Those flower leis, by contrast, looked beautifully colorful and fragrant and lively.

                    And what a gift, eh? A ring of fresh, fragrant flowers to wear? How luxurious and beautiful!


                    Plumeria flower, from which lots of leis are made. Imagine, someone giving you a ring of these!
                    (Photo from Photobucket)


                    History and Customs
                    • Historically, leis were given to honor and celebrate the tremendous voyage of the Polynesians in navigating across the waters of the South Pacific to the islands.

                    This map is super-simplified, but it gives the best sense of the distances involved. Tahiti, at the middle right, is one of the hundreds of islands in Polynesia. Hawaii, above it and about even with Japan, is one of the Hawaiian islands. From Tahiti to Hawaii is about 2,600 miles. Polynesians made the journey some time in the 3rd century.
                    (Map from Cruising Plus)


                    • Hawaiians also gave leis to each other to express all sorts of important emotions -- respect, honor, love, peace, a bond of welcome, a wish for children. They were cherished and carefully protected.
                    • People also made leis as offerings to the gods to ask for a good harvest, for healing, or for fertility.

                    Leis were also given to confer a title on a chief. Here, fans have draped leis on the statue of Duke Paoa Kahinu Mokoe Hulikohola Kahanamoku, or the Duke, who was born on Waikiki in 1890 and is generally considered the father of modern surfing. He was also an Olympic medalist in swimming.
                    (Photo from photolulu)


                    • If a lei falls into the hands of an enemy, this is considered terrible bad luck.
                    • Flowers traditionally used include plumeria, dendrobium orchids, ginger, pikake, and ilima.

                    This lei is made from dendrobium orchids in purple, lavender, and white.
                    (Photo and lei from With Our Aloha)


                    • Leis were originally made not just of flowers but also of leaves and grasses and seashells and nuts. They were also not closed to make a necklace but open-ended, more like a shawl.
                    • Maile, a plant that grows on vines, was one traditional plant used in leis. These types of leis used to be given reverentially to older people or were used to signify the arrival at a peace agreement among chiefs. Today, perhaps because of their connection with traditional culture, these are used more often in ceremonial dances and weddings.

                    Traditional open-ended maile lei. This one is made of two strands of the vines.
                    (Photo and lei from Hawaii Flower Lei)

                    • Maile is not very plentiful these days, so it's hard to find maile leis. Don't get your heart set on using these types of leis in your wedding, either, because there are restrictions on where maile plants can be shipped.
                    • Ti leaves are another plant traditionally used in leis, and they are still quite common today. People plant them around their houses to ward off evil spirits.

                    Traditional open-ended lei made of ti leaves
                    (Photo and lei from Hawaii Flower Lei)

                    • During the late 1800s and early 1900s, a time referred to as "Boat Days," when more white people began traveling by ship to the islands, visitors were welcomed to the islands with leis.
                    • Also around this time, more European flowers were introduced to Hawaii, flowers such as carnations, gardenias, pansies, roses, and violets. Leis were redesigned to include these flowers.

                    This lei is made of roses and crown flowers
                    (Photo from Sweet Blossoms Hawaii, which hosts lei-making demonstrations)


                    • A legend grew at about this time that, as you were leaving the islands, if you threw your lei into the ocean as you were passing Diamond Head, the lei might wash ashore and that would mean you, too, would someday return.
                    • The tradition of giving leis has extended so that visitors arriving not just by boat but also by plane are also welcomed with leis.

                    Here's the Brady Bunch being given leis upon their arrival in Hawaii. The part I mean for you to see starts at 3:58. The sound is really bad so you'll have to turn your speakers way up to hear it.


                    • Leis no longer must be given at very sacred times, but may be given during any celebration such as weddings, anniversaries, birthdays, graduations, or on any occasion.
                    • Technically, the plural of lei does not add an "s" but is still lei. Oops.

                    Lei Etiquette


                    What to do when someone approaches you like this:
                    (Photo from Aloha V.I.P. Tours)


                    • A lei is a symbol of the giver's affection and welcome to the recipient. Therefore, refusing a lei is considered extremely rude. Always accept a lei when it is offered.
                    • For the same reason, it is rude to take it off in the presence of the giver. If you really don't want to wear it, wait until the giver is out of eyesight before taking it off.
                    • If you are allergic and can't wear the lei, put it in some place of honor or respect.
                    • It is also very bad form to ask another person if you can have his or her lei.
                    • You're supposed to wear it, not like a necklace, but over the shoulders so that it hangs down equally in front and back.
                    • If the lei is not tied, keep it that way, with the ends hanging down in front.
                    • It is considered disrespectful to throw a lei in the trash. When the flowers have wilted, remove them from the string and scatter the flowers in a yard or over water, or bury them.
                    • This seems a bit out of keeping with the rest of the rules, but you can store a lei in a plastic bag and keep it in the crisper of your refrigerator. Keeping it in the regular part of the refrigerator will make it too cold.

                    Making Your Own


                    Someone in the process of making a lei out of jade flowers.
                    (Photo from Active Rain)


                    • You can make your own lei, whether you live in Hawaii or not. Here's how:
                    • Gather about 50 medium-sized flowers -- daisies, carnations, even roses. But I think flowers that are wide and would lie flat would be the best choices. Remove the stems.
                    • Find some sturdy cotton string or even dental floss, and cut it to 100 inches long.
                    • Find a large needle -- one that's about 12 to 18 inches is best, but any large needle will work.
                    • Thread the string on the needle so that the needle is at the half-way point of the string. This will leave you with a string that's 50 inches long.
                    • Leaving about five inches extra at the very end of the string, tie a large knot. The knot will stop the flowers from sliding off the string, and you'll want the extra on the other end of the knot so you can tie the lei into a necklace when you're done.
                    • Now you're ready to start stringing the flowers. Push the needle through the very center of the face of the first flower. Push very carefully all the way through to the back of the flower.
                    • Slide the flower very carefully down the length of the string to the knot. Don't force them. You may find it works better to coax them a little ways along at a time.
                    • Add other flowers in the same fashion, in whatever pattern you wish.
                    • Continue until you have about 40 inches worth of flowers on the string.
                    • Knot the other end of the string and then tie the two ends together. You may want to tie a ribbon over the place where you've tied the ends together, or you could leave it plain.
                    • Some people use this same technique to make a long string of flowers that they use as decoration, around a wedding cake, for example.

                    A lei of orchids around a wedding cake
                    (Photo from Hawaii Flower Lei)


                    Or Just Order Them
                    • If you don't live in Hawaii and you don't want to do all that work, you can have leis shipped to you. One lei florist that does this, Hawaii Flower Lei, guarantees that they will arrive fresh and intact at your door.
                    • But of course it will cost you. They have all sorts of leis you can choose from, and they range in price from about $14 to $25 for single strands, and $28 to $50 for multiple strands.
                    • Shipping, of course, is extra, and since you don't want those flowers to wilt or perish, your shipping choices begin at FedEx 2-day and get more rapid from there, which means shipping starts at $20. And apparently since each lei requires careful handling, the charge is per item.
                    • So if you want one lei shipped to you, the cost starts at $34 and goes up.

                    This lei is made of purple micro ginger, and is very fragrant.
                    (Photo and lei from Hawaii Flower Lei)


                    Sources
                    Mooleo, talk story, The History of the Hawaiian Lei
                    Hawaii Flower Lei, lots of pages from this site
                    Hawaii Web, Island Leis
                    Gecko Farms, A Short History of Hawaiian Leis
                    Aloha Hawaii Lei, History of the Hawaiian Lei
                    Hawaii for Visitors, How to Give and Receive a Lei