Thursday, July 29, 2010

Apple #474: How to Avoid Getting Trampled

Ever since I read about the people who got trampled at the Love Parade in Germany, I've been wondering, now what are you supposed to do, again, if you're in a crowd like that?  Work your way to the outside, right?  But those people were in a tunnel.  There was no "outside" for them to get to.  What should they have done?


When people are this tightly packed together, it's too dangerous.  An estimated 1.4 million people turned up for the Love Parade when the venue was capable of holding only 300,000.
(Photo from Billboard.com)


This isn't a very happy Daily Apple topic, I know.  I'm choosing to believe that because I'll be giving safety tips, talking about prevention and avoidance, that will in the end make it a positive entry.

Strategies to avoid getting caught up in a crowd vary depending on how thick the crowd is, how pressed-together the crowd has become.  So I'm going to start with early warning signs, things you can do before it gets tight, and what you can do at each stage from there.
    • Get a map of the venue and find the exits.  If it's an outdoor, multiple-street event, look for side roads that lead to larger thoroughfares that aren't part of the event and that will be less congested.
    • Look for indications that organizers have put some thought into this event and are prepared to handle the crowd.  You want to see methods of crowd control -- things that will help keep a crowd from getting out of hand in the first place, or ways that someone in charge can redirect a crowd or avert any problems.
    • Good crowd control things to look for are:
        • Barriers.  These could be metal barricades, sawhorses, caution tape, ropes, etc.  Yes, these are actually good things, not obstacles, because they help channel the group to a manageable size, and they'll keep sudden bottlenecks from forming. 
     
    Metal barricades like these at music or sporting events are actually good things.  They'll help keep crowds from getting out of control.
    (Photo from Blockader)

        • Directional signs.  Seems simple, but these do help because they tell people which routes are best, not which ones seem the most convenient at first but then turn out to be bottlenecks.  If a lot of signs have been knocked down or walked over, that's an indication that the crowd could be getting too big.
        • Police officers or security personnel, especially uniformed people who can see above the crowd.  They could be standing on a building or even astride a horse.  Higher vantage points will help them to see situations as they form and try to keep anything from getting out of hand.  The fact that they're officials will also mean that they'll have more success than an average Joe at trying to redirect or split up a large crowd.

    I know a lot of people out there don't like to see mounted police officers at concerts or popular events, but they can do a lot to keep crowds from getting dangerous.  The fact that the officers at the Love Parade apparently didn't do much, well, that's another story.  (Did you notice the velvet rope in this picture too?  Another crowd control device at work.)
    (Photo from Wikimedia Commons)

        • Loudspeakers.  These could be speakers set up on large stands, or they could be bullhorns that security personnel are carrying.  Sometimes somebody's got to tell a crowd what to do or where to go.  If there are a lot of people in the area, these things will be crucial at redirecting the foot traffic.
    • If you're about to enter a crowded area and you don't see any of these types of crowd control, it could become a dangerous situation.  Hang back until any clustering subsides, find a different route, or even turn around entirely.
    • When you do join a large crowd, try to keep close to the edge if you can.  This will give you the greatest freedom of movement and flexibility in case things start getting too bunched up.
    • If you're already in the thick of a crowd, make sure you have enough personal space around you so that you can plant your feet and keep yourself stable, if necessary.  They say there shouldn't be more than four people per square meter, but I don't know how big a square meter is.  A good indication is that if you're being touched on all four sides, the crowd is too closely packed and you should seek an area that's less congested.
    • If you get jostled and don't have enough room on the ground to plant a foot, it's really gotten too close.  Time to make getting out of the crowd your main priority.

    A crowd in the streets of New York after the Giants' Superbowl parade. Although this crowd is closely packed, the mounted and motorcycle police are close at hand, keeping an avenue open in the crowd. While there was some disorderly behavior, this crowd never really got out of control.
    (Photo from The New York Times)

    • In order to get yourself out of the crowd, experts say that it won't work if you turn around and try to press face first against the crowd.  But you can sometimes move sideways as the crowd surges forward. Pull your arms in close to your body and don't try to push against the flow of the crowd but keep edging and zig-zagging among the people as they move forward until you reach the outer edge of the group.
    • If you're in a tunnel, which was where the people at the Love Parade got stuck, working toward the edge wouldn't do any good. In that situation, experts say that if you can, move gradually backward.  This seems a little dangerous to me because you wouldn't be able to see where you're going or to know if someone is going to run into you from behind.  But the reason they say this is because the crowd will have bunched up due to a bottleneck ahead of you.  It's only going to get more crunched together as more people press in from the back of the crowd.  The only exit then is to the back. 
    • If you drop something, forget about it.  Don't stop to pick it up or try to make the crowd stop or flow around you.  Even if it's your purse full of irreplaceable photos of your dearest sweetest honey pie, you're better off with out it.  In fact, at this stage, you're actually better off if you're not carrying anything.
    • If you do fall down, curl up in that good old fetal position.  Protect your head and your stomach from being kicked accidentally.  If it's possible, try to roll toward the outside edge.  But make sure to protect your more vulnerable parts.

    Hopefully you'll never get to that point.  Remember, just because a ton of people are heading over there, that doesn't mean that's the cool place to be or the place you need to be right this minute.  Enjoy the show, but allow yourself the room you need to move and breathe, and stay safe.


    The people in this crowd aren't pressing against each other.  Everybody has enough space all the way around, everybody can easily keep both feet on the ground, nobody's panicked and nobody's pushing forward with a lot of demanding urgency.  But clearly, they're all very interested in what's about to happen -- they've gathered at an annual feast day and they're all about to eat.  Looks like a good crowd to me!
    (Photo from Living in Sri Radhakund)


    Sources
    Amanda Ripley, How Not To Get Trampled at the Inauguration, Slate.com, January 19, 2009
    wikiHow, How to Evade a Stampede of Shoppers
    M. M. Rooni, Stampede Safety Precautions, Associated Content from Yahoo! March 9, 2010
    Ask Metafilter, What's the best way to protect yourself if you're caught in a stampede? October 1, 2008

    Sunday, July 25, 2010

    Apple #473: Bisques

    I was trading e-mails with a friend of mine -- Mercutio, actually, from the fainting entry.  He was talking about tomato soup, and I said I liked Campbell's Tomato Bisque.  He said, "I love a good Tomato Bisque.  Even though I have no idea what makes it 'bisque'." 

    Thus a Daily Apple is born.


    This is a crab bisque with hunks of extra crab in the middle.
    (The recipe looks really easy. Combine two cans of soup plus your favorite shellfish plus sherry and Worcestershire sauce. Photo and recipe from Thutmose Solomon.)

    • A bisque is a soup that's usually made with shellfish, been thickened with cream and then puréed. 
    • It may also have wine or cognac.  It may also have vegetables.  But usually the three necessary components for a soup to reach bisque status are shellfish, cream, and having been puréed.
    • To get the most flavor into a bisque, many chefs leave the shells on the shellfish during the cooking process. 
    • A chowder is close to a bisque, but it hasn't been puréed. 
    • Making a bisque used to be far more complicated, time-consuming, and difficult.  Here is the traditional French method described by Ochef:
    The preparation of a bisque is no small achievement. It involves marinating the shellfish of your choice in a sherry-infused court-bouillon [a type of broth] overnight, cooking the fish in the court-bouillon with tomatoes, removing the fish and pounding it to a purée in a mortar and pestle, passing the purée through a sieve back into the bouillon and simmering it for a couple of hours. Finally, the hot soup is whisked into a tureen where three (not two, not four) beaten egg yolks are waiting, after which some cream and brandy or sherry is added. 
    • This demanding recipe is probably why it used to be the case, if you saw a bisque on the menu, you knew you were at the finest of French restaurants.  And you'd probably have to pay scads of money for that bowl of soup.
    • Perhaps the most commonly known bisque is the lobster bisque.  Often its presence on a menu today, whether it is prepared according to those traditional instructions or not, still signifies an upper class meal. 
     
    A lot of lobster bisques have the creamy puréed broth, but then people also put chunks of lobster and maybe other shellfish into it. This one seems to be more like a "true" lobster bisque with a hunk of lobster tail added as a garnish.
    (Photo and soup from Heller's Sea Food Market, which sells a bowl of this bisque for $6.99)

    • In the case of lobster bisque, many chefs remove the shells before cooking so that nobody bites into a stray chip of tough lobster shell.  But some chefs still leave the lobster shells on, and they purée the shells along with everything else.  They say that without the shells, the flavor just isn't as good.
    • After reading all these definitions of bisques, I started to wonder about my good friend, Campbell's Tomato Bisque.  I went downstairs and got a can out of my cupboard and checked the label.

    Sells for $19.55 for a pack of 12 cans on Amazon.

    • They've got the cream in there, and they've got the purée, but there's no shellfish.  
    • I suppose they wouldn't be able to sell as much of the soup if they put any kind of shellfish flavor in it.  Too many concerns about allergies, and maybe not enough people like shellfish either.
    • Considering that Campbell's sells their tomato bisques for about $1.75, I'm going to bet that, in addition to not using shellfish, they don't marinate anything overnight or pound anything with a mortar and pestle, or whisk anything into a tureen.  
    • Well, maybe they use some gigantic industrial-sized vat with a mixing paddle as big as your head.

    This is a 60-gallon processor used by Campbell's in one of their manufacturing plants.  You can see the mixing paddle on the floor next to it.  This particular one was purchased in 1975 and it's been decommissioned.  If you want to buy it, they're offering it for sale on their asset recovery site.

      • If you made your own bisque, you wouldn't need a machine that big.  Even if you didn't marinate anything or use any shellfish, as long as there was cream involved and you puréed it, I think you could call it a bisque and the soup police wouldn't come arrest you.

      The recipe for this tomato bisque doesn't include shellfish, though it does call for chicken broth.  It also has butter and cream and sugar. Yum. Still, I think the key to making a good tomato soup would be to allow it to cook slowly, for a long time. That would reduce the acidity in the tomatoes and coax out the sweetness.
      (Recipe for and photo of tomato bisque from myrecipes.com)

      • Well, I don't actually know if the food police have a department dedicated solely to soup.  But here are the food police at work in London:

      Actually it's just the regular East London police closing down a take-out restaurant because a law was passed recently forbidding the sale of fast food within so many meters of schools.  But you never know when the food police might darken your doorstep and say, "Ma'am, we've received information that you're making a chowder and calling it bisque."  
      (Photo from the Daily Mail)


      I think if there really were a soup police, it would be Alton Brown.


      Sources
      MiMi.hu, definitions of Bisque
      Wise Geek, What is Bisque?
      O Chef, Difference Between a Bisque and a Chowder

      Monday, July 19, 2010

      Apple #472: Bears by Size

      I went to the zoo last weekend with a friend.  We saw polar bears, black bears, brown bears.  This raised the question, which type of bear is the largest?  Is it really the polar bear, as the exhibit claimed?  What about the Kodiak bear?  Time for the Apple Lady to get to work.

      In looking for facts about each species, I found some facts that seemed to be common among most of them.  Bears are mainly huge and strong, but they're also smarter and more capable than I think most of us today typically give them credit for.  Here are some of those common traits:
      • Bears are not nearsighted, as is commonly believed.  Their vision is actually quite good.
      • They have extraordinarily keen sense of smell, often able to smell food from miles away, even canned food.
      • They have excellent long-term memories and their navigation abilities exceed those of humans.
      • Most bears are good swimmers. Some can swim half a mile or farther in fresh water.
      • Many can run as fast as 30 mph.  Imagine a 500-pound animal running at you at 30 miles an hour!
      Here's the list of bears in order of size, from biggest to smallest:
      1. Polar bear
      2. Kodiak bear
      3. Grizzly bear (type of brown bear)
      4. Black bear
      5. Giant panda
      6. Sun bear
      7. Sloth bear
      Now here are the details about each, including dimensions, species name, and a few facts about what they eat and their habits.

      Polar bear
      Ursus maritimus

      This polar bear has collapsed from heat exhaustion. Not a happy sight, but I chose this photo to give you a sense of the bear's size.
      (Photo from Eco-Enquirer)


      nose-to-tail length: 7 to 8.4 ft.
      shoulder height: 5.3 ft. (that's as tall as me)
      avg weight: 900 to 1,600 lbs
      Polar bears are the largest land predators alive in the world today.


      Range, in yellow, of the polar bear
      (Map by National Geographic)

      • There are about 25,000 to 40,000 polar bears in the world.
      • Their paws have several features which help them in their environment:
          • slightly webbed, which helps them swim better,
          • furry even on the underside for greater protection against the cold ice
          • wide and flat, which makes them act like snowshoes
          • that shape also helps them literally shovel snow to build their dens
          • are covered with small papillae -- miniature cleats -- and indentations -- mini suction cups -- both of which help increase friction and stability on the ice
      • Forepaws are 5-3/4 in long and 9 in wide (fatter than they are long). Hind paws are 13 in long and 9 in wide.
      • Their fur is white, which provides camouflage. 
      • Their skin beneath is black, to help absorb heat from the sun.
      • Mature males' fur turns yellow as they age.
      • When polar bears dive into the water, their ear canals close in protection against the frigid water.
      • Seals are their main food source. Polar bears sit by cracks or holes in the ice. When seals surface to breathe, the polar bears lunge its head forward and grab the seal in its mouth.
      • A polar bear will eat a seal once every 5-6 days.  Their stomachs can store 150 lbs of food. 
      • Polar bears can smell seals up to 40 miles away. 
      • They also eat grasses, seaweed, berries, lemmings, and voles.
      • They may also hunt beluga whales and walruses.
      • Females dig their dens into deep snow drifts.
      • 2/3 of all polar bear births are twins.
      • Polar bears have no natural enemies except humans.

      A couple naturalists observed a polar bear and a husky dog becoming friends and playing with each other.
      (More photos at Session Magazine)

      Polar bear swimming. She's using her front paws almost exclusively. 


      Kodiak Bear
      Ursus arctos middendorffi

      The massive shoulder hump on the Kodiak is obvious here.
      (Photo from the North American Bear Center)

      nose-to-tail length: up to 10.5 ft
      shoulder height: 5 ft
      avg weight: up to 1,500 lbs
      The largest Kodiak in captivity was Clyde, who lived in the Dakota Zoo in N.D.  When he died at age 22, he weighed 2,400 lbs.


      The green spot is the Kodiak Archipelago, the only place on earth where Kodiak bears live.
      (Map from Alaska Department of Fish & Game)

      • Kodiaks are a subspecies of the Brown bear
      • They live only on the Kodiak Archipelago in Alaska
      • Only about 3,000 Kodiaks are alive today
      • They have a large shoulder hump, which is a mass of muscle, that helps them dig for food
      • They eat 90 lbs of food a day, most of it plants and berries.
      • Also eat salmon, deer, elk, or cattle.
      • They are usually solitary, but they often feed in large groups. To make sure everyone gets enough to eat without fighting, they have developed their own unique language and social structure.


      Bart the Bear, a Kodiak bear actor, who lived 22 years. This photo gives you a good idea of this bear's size.
      (Photo from Bart the Bear's unofficial home page)


      Brown Bear / Grizzly Bear
      Ursos arctos / Ursus arctos horribilis

      The grizzly bear's white-tipped fur, shoulder hump, and long snout are its easily distinguishable traits.
      (Photo from the USGS)

      nose-to-tail length: 6 to 7 ft
      shoulder height: 3 to 3 1/2 ft
      weight: coastal, up to 1500 lbs
      weight: inland, up to 850 lbs
      avg weight: 550 lbs


      Range, in orange, of the Grizzly or brown bear
      (Map from Defenders of Wildlife)

      • In coastal Alaska and Canada, they are called Brown bears.
      • In the inland 48 states, they are called Grizzly bears
      • Around 1,000 - 1,200 grizzlies in the lower 48, around 30,000 in Alaska.
      • Has a hump on its shoulders and long, straight claws
      • Outer, long hairs called "guard hairs" on back often have white tips, giving them a "grizzled" appearance
      • Brown bears' fur may range in color from dark brown to light blond.
      • Grizzly bears like vegetation and will eat grasses, roots, berries, mushrooms.
      • Coastal brown bears eat salmon but a lot more vegetation than grizzlies.

      I saw this brown bear at the zoo.  He's tearing into a stump to get at the bugs in it. He had just gotten out of the water, where he'd been scooping up seaweed from the bottom of the pool with his claws and eating it by the pawful.
      (Photo by the Apple Lady)

      • Inland grizzlies eat moose, caribou, or elk, or small mammals, as well as vegetation. 
      • 70% of human deaths from grizzlies were by a female defending her cubs.
      • In the lower 48, grizzlies are Endangered, except for those who live in Yellowstone.
      • In Alaska, they are a game animal and may be hunted but according to very strict regulations.

      Grizzly bear's paw. Man, that's big.
      (Photo from Frances Hunter's American Heroes Blog)


      Black bear
      Ursus americanus

      A black bear from Tennessee
      (Photo from First People)

      nose-to-tail length: 4 to 7 ft
      shoulder height: 2 to 3 ft.
      avg weight: 200 lbs to 600 lbs


      Range, in yellow, of the black bear
      (Map from National Geographic)
       
      • May be black, blue-gray, blue-black, whitish-blue, brown, cinnamon, blonde, or even white
      • Eat plants, fruits, nuts, berries, bugs, honey. Also salmon, small mammals, and carrion.
      • About 600,000 black bears in North America, about half in the US.
      • Their eyes are blue when they're born but turn brown as they mature.
      • Black bears have never been known to attack a human. In fact, all adult black bear deaths are human-related.
      • There are 16 subspecies of black bears, mostly distinguished according to where they live.
      • The Cinnamon Bear, Kermode Bear, and Glacier Bear are all subspecies of black bear.
      • Louisiana black bear and Florida black bear are threatened subspecies.

      The Kermode Bear, in the foreground, is a white subspecies of the black bear. You can tell it's not a polar bear by the shape of the head, which is much more round than a polar bear's wedge-shaped skull.
      (Photo from UniqueDaily)


      [edit:] Eagle-eyed regular reader Jason alerted me to this news article about a bear -- a black bear, I think -- that broke into one family's Toyota, accidentally shut itself inside, knocked the car into neutral, and rolled downhill. Really funny and worth a look.


      Giant Panda
      Ailuropoda melanoluca

      Giant panda, doing its favorite thing: eating bamboo
      (Photo from Scientific American)

      nose-to-tail length: 5 1/2 to 6 ft
      shoulder height: 2 to 3 ft
      weight: 200 to 330 lbs.


      Giant pandas live in only six small bits of forests in mountain provinces of China -- those little red dots.
      (Map from the San Diego Zoo)

      • Naturalists weren't sure for a long time whether pandas were more like raccoons or bears. Finally they decided that pandas were a type of bear. But they remain classified separately from all other types of bears.
      • Only about 1,000 to 2,000 giant pandas exist in the world.
      • Eat bamboo almost exclusively, 10 to 12 hours each day.
      • Have large crushing molars, large jaws, and an exceptionally wide esophagus, all the better to eat and swallow the bamboo.
      • Because they can't build up enough fat on their bamboo diet, they don't hibernate in winter but instead migrate to warmer climates.
      • Panda bears were the second animal after dogs to have their genome decoded by scientists.  They discovered, among other things, that pandas can't taste umami, that mysterious and complex sixth taste. So researchers think that meat simply doesn't taste good to pandas, and that this may explain why they prefer bamboo.
      • Unlike many other bears, they're not quick movers, but if necessary, they will catch small animals for food.
      • Have an enlarged wrist bone which is functionally a sixth digit that pandas use similarly to a thumb.
      • They don't roar like other bears but make a bleating sound like a goat.


      Sun Bear
      Helarctos malayanus

      The Malayan Sun Bear showing off its claws and its telltale yellow-orange chest patch.
      (Photo from the Wellington Zoo)

      nose-to-tail length: 4 to 5 ft
      avg weight: 60 to 150 lbs.


      Range, in yellow, of the Sun Bear
      (Map from National Geographic)

      • Named for the lighter-colored bib-shaped patch on their chests, which were said to resemble the rising sun.
      • Sometimes also called the honey bear.
      • Unlike most other bears which are active during the day, sun bears are nocturnal.
      • They are very shy and live in remote areas, so not much is known about them.
      • They are omnivores, but the fruits they like are coconuts, palm trees, and bananas. 
      • They also eat small birds, lizards, and rodents.
      • Sun bear mothers have been observed cradling and carrying their young in their arms while walking on their hind legs.


      Spectacled Bear
      Temarctos ornatus

      Some spectacled bears have markings that go all the way around their eyes, like this one. But not all of them do.
      (Photo from Zoos Worldwide)

      nose-to-tail length: 5 to 6 ft.
      avg weight: 220 to 340 lbs.


      Range, in yellow, of the Spectacled bear
      (Map from National Geographic)

      • Markings on the spectacled bear are unique to each bear, like a fingerprint.
      • Sometimes called the Short-Faced bear or the Andean bear.
      • The only bears that live in South America, they live in the jungles in the Andes Mountains.
      • Mostly nocturnal, solitary except during mating season, and very shy.
      • Eat vegetation including tree bark and orchid bulbs, fruit, berries, cacti, honey. 
      • May also eat meat such as rodents, small birds, insects, and small cows.
      • They have been known to climb trees, break off branches to make a platform, and sit there waiting for several days for fruit to ripen.

      Another spectacled bear, with fairly different markings
      (Photo from the Phoenix Zoo)


      Sloth Bear
      Melursus ursinus

      The sloth bear has shaggy fur which reminds me of a dog's.
      (Photo from Bears of the World)

      nose-to-tail length: up to 6 ft
      avg weight: 120 to 310 lbs.


      Range, in yellow, of the Sloth Bear
      (Map from National Geographic)

      • Have a shaggy black coat, and a cream-colored snout and bib on their chest.
      • Eat mainly termites and ants. They will use their claws to dig open rock-hard insect mounds, blow away the excess dirt, and suck up the insects through a gap in their front teeth.
      • Also eat mangoes, figs, flowers, and sometimes honey.
      • These bears are also sometimes called honey bears.
      • There are 2 subspecies, the Indian and the Sri Lankan.
      • The only bears to carry their young on their backs.

      Sloth bears going after a termite mound in the London zoo.
      (Photo from the London Zoo)


      Other "bears" that are not bears
      • The koala is not a bear but a marsupial.
      • The red panda is not a bear but its own species, more closely related to the raccoon.


      Sources
      Alaska Department of Fish & Game, Brown Bear, Kodiak Bear Fact Sheet
      Kodiakbear.net, Kodiak Bear Facts 
      Defenders of Wildlife, Grizzly Bear, Black Bear
      Great Bear Foundation, Brown Bear, Panda Bear (giant panda)
      National Geographic, Grizzly Bear, Black Bear, Sun Bear, Polar Bear, Sloth Bear
      North American Bear Center, Quick Black Bear Facts, Polar Bear Facts
      Pandabearmd, Panda Bear Facts
      San Diego Zoo, Mammals: Giant Panda, Mammals: Andean (Spectacled) Bear
      Katherine Harmon, Giant panda genome sequenced, explains taste for bamboo, Scientific American, December 13, 2009

      Wednesday, July 14, 2010

      Apple #471: From Ambulance to Hospital

      Regular Daily Apple readers know that I've been having some trouble with my ears following a scuba diving class.  Don't worry, this is not why I'm doing an entry about ambulance services.  I went to the doctor about the ear thing yesterday, and he gave me some prescriptions.  They've had no effect so far other than to make me really speedy, but it's only been one day so I'm going to give it a little more time.

      No, the reason for this entry is because of a question that came up in conversation a little while ago.  A group of us were talking about a news article I'd seen around the 4th of July, which reported that a guy named Eric had blown off his arm while shooting off fireworks.  They weren't your average grocery store fireworks, but commercial-grade mortars he was lighting from a three-foot metal tube.  One of them, after he'd lit it, shot out of the tube and hit him in his left arm and blew it off.


      A rack of tubes designed to hold fireworks mortars.  Harry, the guy who works for Skylighter, the company that makes these mortar racks, says, "When using this rack, I drill holes in the feet and drive spikes through them and into the ground to keep the rack from bouncing and falling over. Care must be taken to avoid driving fasteners into the mortars. In pyro this is known as a 'bad-thing.'"
      (Photo from Skylighter)


      Fireworks mortars can be pretty huge. These are sold by Fireworks by Spectrum in Pennsylvania.


      Eric's friends wrapped his arm in ice and got him and the arm to the hospital.  Unfortunately, it sounds like he lost his arm permanently:

      While she wouldn't comment on the status of Smith's arm, spokeswoman Shelley Lotenburg said the hospital does not perform limb reattachments.

      After many exclamations like "Dude, that would suck, getting your arm to the hospital and it turns out they can't put it on!" we wondered whether he'd been brought to a different hospital, if his arm could have been reattached.  (Actually, a different news article reported that his friends said his arm from the shoulder to the elbow had been "blown to bits," so maybe not.)

      This discussion then led us to a larger question, which none of us knew the answer to, which was, when you're being driven to the hospital in an ambulance, who decides which hospital you get taken to?


      Paramedics in Folsom, California.
      (Photo from the City of Folsom)

      • First of all, the people in the ambulance are EMTs.  That stands for Emergency Medical Technician.  There are different levels of EMT, depending on how much training they've had.
      • Basic EMTs (EMT-1s) are trained for about 120-150 hours in basic life support.  They can assess what's going on, bandage bleeding wounds, and provide basic medications like oxygen, glucose, aspirin, asthma inhalants, or epinephrine.  They can't give shots or IVs.
      • Intermediate EMTs (EMT-Is) get an additional 50 or so hours of training.  They can give shots and start IVs and depending on which part of the country they're in, they may also be trained in assessing cardiac situations and providing appropriate medication, as well as some level of airway management like clearing an obstruction or intubating.
      • Paramedics are EMTs who have gotten even more extensive training.  They receive ten times the amount of training as basic EMTs and have often gotten degrees from two-year programs.  Paramedics can give shots and start IVs, they are allowed to use a lot more types of medications than the EMT-Is, they can handle lots of different airway management situations, they can read EKGs, and they might even be certified to suture wounds.

      Paramedics in training. They're learning how to intubate, provide oxygen, and use IVs.
      (Photo from the Emergency and Investigative Educational Institute in Florida)

      • So the people in the ambulance will all be at least a Basic EMT.  Probably the driver is a Basic EMT.  The people working in the back of the bus might be EMT-Is or paramedics.


      Driver compartment of an ambulance in New Jersey.
      (Photo from Roseland First Aid Squad)

      • Ambulances themselves are given different classifications.  Some provide Basic Life Support (BLS).  Some are equipped for Advanced Life Support (ALS).  
      • All ALS ambulances are staffed only with paramedics.  It used to be that most ambulances were BLS class, but it looks like more communities are getting only ALS ambulances.

      The interior of a 2004 Ford F-350 ALS ambulance in Arizona.
      (Photo from Christopher Kohl's Volunteer Fire Department)

      • Ambulances can vary in other ways, too.  Who owns and operates ambulances can vary from state to state, county to county, and city to city.  Most ambulances are part of local fire departments.  Some ambulances are part of an integrated police-fire-emergency medical response department.  Occasionally ambulances are owned and operated by hospitals or by private medical companies. These hospitals and companies work closely with local fire departments and emergency dispatchers. 

      Interior of a 2008 ALS ambulance owned by the Red Cross in Austria.
      (Photo by ggrexy on Flickr)

      • Regardless, the people inside the ambulance are trained in life support, they know how to assess the severity of a wound or a medical situation, and they are familiar with the hospital services in the area.
      • If you are alert when you're put into an ambulance, you could tell them, "Please take me to such & such hospital, I don't trust the doctors anyplace else," or "My insurance only covers me at thus & so hospital."  Or a family member could say something to that effect.  If possible, they'll do as you request.
      • But there are a lot of factors that go into the decision about which hospital they'll take you to.  Some of those factors might trump your wishes, in which case they'd take you to a different hospital.

      Interior of an ambulance in New Jersey
      (Photo from Roseland First Aid Squad)

      • Here's what's involved in deciding what hospital to go to:
        • Which is closest. Even if the nearest hospital may be across county or state lines, most ambulances are allowed to bring patients to whichever is closest.
        • Type of medical need, and which hospital treats those situations. For example, serious trauma patients need to be treated at Level 1 Trauma Centers, but not every hospital has such a center.  Not every hospital has a pediatrics unit or an OB/GYN unit either, which means not every hospital will accept a woman in labor.
        • Hospital availability.  Occasionally, a hospital may send out an alert that they can't accept more patients.  Their beds are full, some crucial equipment is not working, or they don't have enough staff on hand.  When that happens, a bulletin goes out to the dispatchers and the ambulances so they'll know not to take people to that hospital.
        • Patient request. Especially if the patient's request is based on insurance coverage, or previous history with a hospital or medical personnel at a given location, this will play a fairly big role in the decision.
          • Police custody. If a patient is in police custody, the police can dictate where the patient has to be taken.
        • Here's one dramatic example of when the nearest hospital isn't always best. A guy named Chuck who'd had a stroke when he was out mountain climbing had a helicopter ambulance come out to get him.  The pilot wanted to take him to the nearest hospital, but the paramedic and the nurse on board said no, take him to this other hospital 15 miles farther away because they have a certified stroke center.  They stood there yelling at the pilot until he agreed to take Chuck to the other hospital.  When he got there, the hospital with the stroke center gave him a specific medication that dissolved the clot in his brain, saving his life.  The nearer hospital probably wouldn't have had that medication on hand.

        The interior of a helicopter ambulance. This one is the AW139, and it's in use in the US, the UK, and Italy.
        (Photo from aerospace-technology.com)

        • In general, where an ambulance takes a patient is a judgment call and there's some flexibility in the decision-making process.  
        • Based on some chat room conversations among EMTs, it sounds like those who work for hospitals or private companies, as opposed to local governments, are told to give the patients' wishes a higher level of priority -- which can be frustrating to the EMTs.


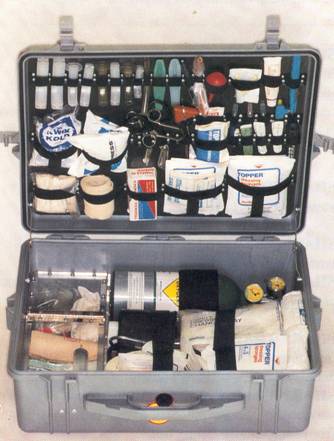
        Because I'm curious about things inside of ambulances, here's an EMT trauma kit. It contains an array of bandages, scissors, ointments, cold compresses, gloves, and other essentials. That cylinder toward the back contains oxygen. The whole thing weighs 24 pounds.
        (Photo and EMT O2 trauma case from Biotek)

        • One last fact.  It's difficult to get total data on the number of ambulance trips made for the entire country.  But I can tell you that the total number of ambulance trips in 2001 that were billed to Medicare -- which is certainly not all of them --  topped 10 million.

        Sources
        NY man blows off arm with fireworks, CNN.com, July 4, 2010
        Man who lost arm lighting fireworks in stable condition, WABC, July 5, 2010
        AlliedHealthWorld, EMT and Paramedic, EMT and Paramedic FAQs
        Rod Brouhard, About.com: First Aid, The Difference Between an EMT and a Paramedic
        Bureau of Labor Statistics, Emergency Medical Technicians and Paramedics
        Wikipedia, Paramedic
        emtcity.com, It is the patient's choice right?
        Wanakee Area EMS FAQs
        Hopper Institute, EMS Calls
        Sierra-Sacramento Valley EMS Agency, ALS Program Policy
        Salt Lake City EMS District Hospitals, Hospital Diversion Protocol 
        Poudre Valley Health System, Ambulance Services
        Crozer-Keystone Health System, Springfield Hospital EMS
        Elizabeth Cohen, Picking the right hospital can save your life, CNN, July 26, 2007
        GAO, Ambulance Services: Medicare Payments Can Be Better Targeted to Trips in Less Densely Populated Areas, September 2003

        Monday, July 12, 2010

        Apple #470: Broken Eardrum

        As you faithful Daily Apple readers know, I had my first scuba diving lesson last week.  Unfortunately, my ears have been all weird since then.  I had trouble equalizing the air pressure in my ears during the diving, and since then, they have not stopped clicking and clunking and popping and crackling etc. every time I swallow.  The right ear is worse than the left, but they're both doing it.  So I'm kind of hung up on ears at the moment.


        Side view of the inner workings of the ear. The eardrum vibrates as sound waves enter the ear, and those vibrations are transmitted to those tiny bones just beyond it.  The bones further transmit the vibrations to all the sensitive stuff in the cochlea, and that all gets transmitted up the auditory nerve to the brain.  That's how we hear sounds.
        (Diagram from Answer Bag)


        Not only is all the clicking and clacking driving me nuts, I'm afraid it may mean I won't be able to scuba dive anymore.  Some people, because of the shape of their ear canal or something, are never able to "pop" their ears as they descend in a dive, which means the air pressure behind the eardrum builds and builds, and the only way to rectify the problem is either to surface and not go back down again or suffer a burst eardrum.

        I do not want to be ineligible to dive ever again, nor do I want my eardrums to burst.  I have been reading somewhat obsessively about ways to equalize the pressure in one's ears.  If there's a suggestion out there, I've tried it.  In brief, here's what I've tried so far:
        • swallowing
        • yawning
        • chewing gum
        • moving my jaw side to side
        • stretching my mouth as far as it will go
        • thrusting jaw while tilting head sharply
        • massaging the area behind my ear
        • holding my nose and swallowing, then swallowing again
        • Valsava maneuver: hold the nose, close the mouth, and blow air
        • Frenzel maneuver: hold the nose, close the mouth, make a K sound
        • blowing my nose
        • sneezing
        • hiccups
        • ibuprofen
        • aspirin
        • Sudafed (decongestant, to help clear any build-up in the ear canal)
        Most of these I have tried not just once but several times, to no avail.  I used to swim and go into the deep end all the time when I was a kid and I never had problems like this.  So I am becoming more and more concerned that this may be an intractable problem.


        Here is a close-up of just the middle ear.  When everything's working properly, the Eustachian tube should work like a valve, opening and closing for a fraction of a second during swallowing or yawning so that the air pressure on the inside of the eardrum equals the air pressure on the outside of the eardrum.  My Eustachian tubes, apparently, are not opening and closing like they should be.  Or if they are, maybe there's some sort of blockage in the middle ear that is preventing air from getting in there the way it's supposed to.
        (Diagram from Eon Meditech)


        [EDIT:] I found out that what I have is called Eustachian Tube Malfunction or Dysfunction.  The tubes stay closed even when things you do should make them open.  Allergies, pollution, cigarette smoke, colds, the and the flu are some of the things that can mess with the way your tubes work.  The lining of the tubes gets irritated or inflamed and even though the tubes may be trying to stretch open, because of that swelling, they can't really open.

        There's not a whole lot they can do about this.  The best treatment is decongestants/antihistamines, nasal sprays, and steroids, all of which are supposed to help reduce inflammation and congestion so that the tubes will relax and open again.

        I went to the doctor, and he gave me prescriptions for all three of these things.  He said to try the decongestant/antihistamine and the nasal spray for a week and if those didn't work, try the steroids.  It hasn't been a week yet, but the pills and the spray aren't doing much, though the pills are making me pretty speedy.  It looks like I will be trying the steroids soon.  Cross your fingers that those work!


        But all this is not the point of this entry.  While reading about how to equalize the pressure in my ears, I read that a burst eardrum will heal on its own.  I did not know this.  I always thought it was an enormously bad thing to break your eardrum.  But maybe it's not.  So that's my question:  how bad is it if you perforate your eardrum?


        Drawing of a perforated or ruptured eardrum.
        (Drawing from Eon Meditech)


        CAUSES
        Lots of things can poke a hole in your eardrum.
        • Ear infection
        • Explosions
        • Sharp slap to the side of the head, for example, from a hard, slapping fall onto water
        • Inability to equalize air pressure during flying, diving, or driving in the mountains
        • Inserting Q-tips or other sharp objects into the ear
        • Other foreign objects in the ear


        SYMPTOMS
        Most of the time, people who've ruptured their eardrums experience severe pain.  But sometimes it subsides right away, if the rupture has been caused by an infection or a slow build-up in pressure against the drum.
        • Severe pain.
        • Severe and sudden pain followed by a sudden decrease in pain.
        • Moisture draining from the ear. May be clear, or yellow like pus, or bloody.
        • Changes in hearing, which could include buzzing or ringing or clicking
        • Partial hearing loss
        • Dizziness or vertigo

        Sometimes there are additional problems which can have severe symptoms:
        • Constant spinning sensation
        • Difficulty walking due to problems with balance
        • A change in the ability to taste foods (?!)
        • Stiff neck
        • High fever
        • "The worst headache of your life"
        • Continued vomiting
        • Abrupt change in vision
        • Difficulty staying awake
        Pretty much any time there's continuous vomiting, high fevers, or abrupt changes in any of your senses, you're going to want  to get yourself to that ER.


        TREATMENT
        Most of the time, a ruptured eardrum will heal on its own.  Healing make take a few weeks to two months.

        During that time, it's important to keep the interior of your ear clean and dry.  Without the eardrum, the inner ear will be exposed to more viruses and bacteria that could cause infection.  So you need to do what the eardrum can't and shield the inner ear as much as possible.
        • Place cotton balls in the entry to the ear -- don't shove them in there, just place them over the opening -- while showering or bathing or shampooing
        • Avoid swimming or immersing your head in water
        • Your doctor may prescribe antibiotics, especially if it was an infection that perforated the eardrum in the first place.
        • You'll probably also take some sort pain killer to reduce discomfort.  
        • You may also want to put a heating pad over the ear to soothe and reduce the pain.
        • If the eardrum doesn't heal, or if the hole is especially large, surgery may be necessary to close up the hole.
        • If surgery is necessary, the surgeon may use any number of materials -- a skin graft, a bit of muscle or fat, or even a piece of paper.  This material will be work like a patch, and it will also act as a base on which the tympanic membrane can grow and eventually close up the hole.

        HEARING LOSS
        Any hearing loss suffered during the rupture is usually not permanent.  It is possible that scar tissue may develop on the eardrum, which would result in some minor loss of hearing.

        If an infection occurs while the eardrum is healing, and if the infection is allowed to spread more deeply into the ear toward the brain, then hearing loss may be permanent.  But that's a lot of if's.


        So, to sum up, rupturing your eardrum is really painful when it happens.  But it will heal and probably you won't suffer any permanent hearing loss.  Good to know.

        Sources

        Edmond Kay, M.D., Prevention of Middle Ear Barotrauma
        Baylor College of Medicine, Eustachian Tube Dysfunction 
        Timothy C. Hain, M.D., Dizziness-and-balance.com, Eustachian Tube Dysfunction (ETD)
        Medline Plus, Ruptured Eardrum
        Medline Plus, Ear Emergencies
        emedicinehealth, Perforated Eardrum
        Mayo Clinic, Ruptured Eardrum
        The New York Times Health Guide, Ruptured Eardrum

        Friday, July 9, 2010

        Apple #469: Your First SCUBA Lesson

        I just got home from my first scuba lesson, and I LOVED it!  I am so excited, I couldn't wait to tell you about it.  Well, I also wanted to do this entry because I had many questions before the lesson and I couldn't find answers online, so this is for anybody else about to take their first lesson in scuba diving so they'll know what to expect.  But before I get into all that, let me just say again how much I LOVED IT!  It was so cool!

        If you like to swim, if you like being underwater, and if you ever get the chance to scuba, you should totally try it out.  It's like a dream come true, being able to breathe underwater about the same as you would out of the water.  You get to swim around, and you've got the big flippers on, so your leg kicks are much more powerful than they'd be with your feet alone so with just a little bit of effort you're cruising, and meanwhile, your whole body is underwater, but you're breathing in and out like normally.  It's really phenomenal.  And I didn't even do that much tonight.  Oooh, I'm excited.

        Okay, I'm going to try to calm down enough to tell you what I want to say.  My purpose with this entry is really to tell people what to expect the first time they take a scuba lesson.

        One note about terminology first.  Scuba is really an acronym.  It stands for Self-Contained Underwater Breathing Apparatus.  So really I should put the word in allcaps every time I use it.  But that will get annoying and shouty, so I'm just going to call it scuba.  Scuba, scuba, scuba.


        All this equipment might look weird, and it might feel weird wearing it out of the water, but once you're in the water, you'll appreciate all the fantastic things it does for you and all it will enable you to do.
        (Photo from Vai Diving)

        • If you want to do any scuba diving, you need to get certified first.  All scuba certification means is that you've been properly trained in all the safety procedures, you know how to use the equipment, and you and your diving buddy can have a fun, safe dive.
        • There are more advanced training classes you can take if you want to do more advanced or exotic things like cave diving, or if you want to be able to do scuba diving for a job -- underwater ship repair, for example, or marine biology research.  But if you want to go scuba diving just for fun and recreation, you need to get a basic level of certification.
        • I should qualify that by saying that a lot of dive shops and other places that do certification classes will often offer what's called a "discovery dive."  This is sort of like a mini version of the first certification course.  It gets you in the water, gives you a chance to try out the equipment, see if you like it, see how you like being underwater, without having to pay the full price for the complete set of certification classes.
        • The certification, by the way, does not expire.  Once you're certified, you're good to go for life.  Carry your certification card with you and they'll let you dive wherever you go.  Even if you don't take another refresher course ever, as long as you've got your certification card, you're still qualified. 

        This is what the PADI certification card looks like.
        (Photo by appaloosa on Flickr)

          • Okay, so say you've decided you want to get certified.  There are three major associations which manage the whole certification process, and a dive shop may offer classes through one or some or all.
          • The first association is PADI.  This is the Professional Association of Diving Instructors.  This is the one you'll probably want to do if you're scuba-ing for fun and recreation.  It's also the largest association of scuba instructors.  Your nearest dive shop is most likely to offer PADI instruction.
          • NAUI is the National Association of Underwater Instructors.  This one operates globally, and it's very similar to PADI but it does have some more technical aspects.  Apparently it's better to go this route if you want to get certified for employment purposes.
          • SSI or Scuba Schools International is similar to PADI, but it is not as widespread.  It's headquartered in Colorado so there are a lot of SSI schools around there.  It's also big in Southeast Asia. [shrugs]
          • There are other associations which train people in scuba diving, particularly outside the US.  But these three are the most common in North America.
          • The initial certification class, if you go the PADI route, is called Open Water Diving.  That name sounds like you'll be jumping right into the water with the tank on and told to swim for it all by yourself, but it's not that way at all.
          • The Open Water Diving course mixes in-classroom instruction and in-the-water training. In the first three sessions you'll spend half the time in the classroom and the other half in the water.
          • During the classroom part, you'll watch some videos prepared by the PADI people that demonstrate the basics of the equipment, explain buoyancy, describe what happens to your lungs and your ears as you descend to deeper waters, and what happens as you ascend to the surface, etc.
          • You'll take really short multiple choice quizzes which test how well you've absorbed these basics, but don't worry too much about those quizzes.  They're very low-key, it's okay if you get some answers wrong, you can ask your instructor questions about things you didn't understand, and it's up to your instructor to make sure you get it.
          • During the second half of the class, the instructor will take you to the swimming pool or to a shallow, contained area in a lake or springs.  He or she will show you how to choose a mask that fits -- that's very important -- how the air tanks work, and how to attach the regulator to the air tank.  

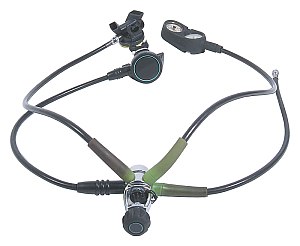
          (Photo of a complete regulator from scuba-diving-smiles.com)
          • The regulator is actually a group of four hoses.  They all connect in the center at what's called the first stage.  This is where the compressed air coming out of the tank gets decompressed to the surrounding air pressure level so you can breathe normally.  The four hoses each have their own purpose.  
          • Reading from top down, right to left, the first one has a pressure gauge on it so you can see how much air is left in the tank.  It also contains a compass.  
          • The second one connects to the BCD vest (more on that in a moment).  
          • Over on the left, the one with the big round thing on the end of it is your alternate air source.  This one is in case your buddy runs out of air.  You can give this one to your buddy and the two of you can breathe from your tank.  Or if something goes wrong with your air source, you can use this one as a back-up.
          • On the top left, the one with the most complicated-looking gizmo on the end of it is the one you breathe through.  The whole system of hoses is called a regulator, but this one mouthpiece gizmo is also called the regulator, or the second stage.

          In this photo, they're showing you both the first stage -- where the cluster of hoses connects to the air tank, that's the part in the background -- and the second stage, which is the part you breathe into, in the foreground.  The mouthpiece part is facing away from the camera.  That's the part you put in your mouth and you can grip onto it pretty well with your teeth, though you don't really need to clench hard.  The silver part facing the camera has a button you can push to clear water out of the regulator if you need to, but most of the time you probably won't need to.
          (Photo from Underwater Diving Equipment)

            • The instructor will also show you how the BCD vest works.  The BCD vest is a a totally cool device.  BCD stands for Buoyancy Compensator (diving).  The diving is in parentheses because there's a similar device for aviation which is called the BCA.  This vest is made of nylon, and it's got all sorts of velcro straps around it.  There are some at the back that strap and clip around the air tank, and there are some at the front that strap and clip around you.  But wait, there's more.
              • There are also built-in pouches where you can stow weights.  It may not seem like you'd want weights, but when you've got the vest on and the air tank, and if you're wearing a wet suit, which is extremely buoyant, you'd probably bob at the surface and pretty awkwardly, too.  The weights will help you get below the surface of the water.  After that, the breathing pretty much takes care of the rest. 

              You can see how this BCD vest clips twice in the front.  Those purple things on the side with what looks like orange seat belt fasteners are where the weights go.  They slide into the pouches and then clip to the orange things.  If you need to lose your weights fast, unclip the orange things and fling the weights away.
              (This vest sells for $235 from Scuba Toys.com -- or it used to anyway.  It's now either out of stock or been discontinued.)

                • The best and most coolest thing about the BCD vest is that it INFLATES.  There's an accordion tube on the left side of the vest which connects to a hose to your air tank.  The accordion tube has two buttons on the end of it, one to inflate, and one to deflate.  Push the button, your vest inflates, and you rise in the water.  Push the other button, your vest deflates, and you sink.  If you're at the surface, push the button to inflate the vest, it blows up, and instantly you feel light almost as air and you hardly even have to tread water.  Marvelous.

                On this BCD vest, the accordion tube where the inflation/deflation happens is very visible.  I'm not sure I like the zipper on this vest, though.  Too easy to get stuck.  I'd rather have the clip & releases instead.
                (This vest sells for $479 from Scuba Toys.com)

                • All these gadgets have back-ups or fail-safes in case something goes wrong with them.  In the case of the BCD inflator/deflator thing, if the buttons quit working, you can also hit a bypass and blow into the accordion tube and inflate it with your mouth.  There's also a little pull-knob on the right side of the vest which is kind of like a rip cord.  Pull that and the thing deflates. Ingenious.  I mean, really.  The people who invented these things thought of everything.  It's kind of like having your very own Bat-vest.
                • So you get introduced to the BCD, you're shown how to strap in the air tank, connect the regulator, put everything on, and get into the water.  Once you're in the water with all your gear on, the instructor will show you how to breathe with the regulator.  If you can breathe through your mouth, you can breathe with a regulator.
                • You put the mouthpiece in your mouth and lower your face into the water.  Instinctively, you'll hold your breath.  But the next second, you'll want to inhale.  And it's okay.  You can inhale through your mouth with the regulator in with no trouble.  The compressed air does some of the work for you, so in a way, it's even less taxing to breathe with the regulator and tank underwater than without.  When you exhale, breathe out through your mouth.  Keep the regulator in your mouth and the air bubbles will push out around and past the regulator just fine.  When you're ready to inhale again, do.  It's that simple.

                See?  Breathing underwater is all OK.  Oh, you'll also learn hand signals to use underwater.  This is OK.  Thumbs-up does not mean OK, but let's go to the surface.  I'm going to have to get used to that.
                (Photo from Aquaviews)

                  • If you've ever snorkled, you know how water can get into your snorkel tube and get all bubbly and burbly in there and kind of unpleasant.  You would think that even more water would get into the scuba regulator, but in fact the opposite is true.  Unless you take the regulator out of your mouth, you don't sense any water in the way at all.
                  • You will take the regulator out of your mouth, though.  This is one of the things the instructor will teach you how to do because you need to be prepared in case something happens on a dive and you'll know that it's really not a big deal at all getting the regulator back in your mouth.

                  This is what the in-the-pool part of the class looks like.  You're underwater with all your gear on, and so is the instructor.  He'll have shown you on the surface what's about to happen, then you'll all go underwater and he'll show it to you again.  Then he'll show each of you individually, and you need to do what he does back to him.  In this photo, the instructor is demonstrating how to take off your mask underwater and put it back on (this particular lesson isn't until the second class, though).
                  (Photo from Scuba Diving Brazil)

                    • You'll practice taking out the regulator, continuing to exhale through your mouth without it, and putting it back in.  When you do, there will be a very small amount of water in the regulator.  There's a button you can push on the back of the regulator that will shoot it out, or you can huff a little bit harder into the regulator than a regular exhale and that will clear it.  It's really easy because the equipment is so ingeniously designed.
                    • So during your first class, you'll practice a lot of breathing things, you'll practice clearing water out of your mask -- this is a little tricky because it involves breathing out through your nose, and since you've been breathing only through your mouth for some time, you have to sort of re-route your breathing -- and you'll practice dealing with the change in pressure as you descend to deeper water and getting your ears to pop like you do when you fly a plane.
                    • Once you get to swim around a bit on your own, you'll see that scuba-ing is actually really relaxing.  You have to keep breathing in and out so that your lungs can keep adjusting to changes in pressure, and it's best if your breaths are long and slow and deep.  That deep, slow breathing combined with the way things move a little bit more slowly underwater make it all a pretty calm, relaxing experience. 
                    • So what you learn in the first class is all pretty basic, low-key stuff.  No need to batten down the hatches or go into major scuba-preparation mode or anything like that.  You'll be in a classroom, you'll be in the water, you'll learn some new stuff.
                    • You'll want to eat a decent breakfast that day and a good lunch, too, but don't overdo it.  It's not as big a deal how much you eat or what you eat before your first training class as it is before you do an actual dive.  But, you know, be nice to your body.  It's going to learn a new skill today.
                    • It's also a good idea to drink a little more water throughout the day than you normally would.  You'll be breathing through your mouth which dries things out a bit in there, you'll be in the water which requires more energy than you think it will, and if you're training in a pool, the chlorine will dry you out.  So some extra water in your system will be helpful.
                    • Most dive shops will let you use their equipment as part of the cost of the classes, so all you'll need to bring is a bathing suit and a towel.
                      • That's it!  It's great.  Have I mentioned that?  I loved it.  I can't wait until my next class, which is next week. 
                      • Oh, right, that's just the first class.  There are three of these classroom/pool classes, and then there's the fourth part, which is the open water dive part.  That's when you have to put together everything you learned in the classes and demonstrate to your instructor that you know what you're doing.  

                      This is an open water dive class in Alexander Springs, Florida.
                      (Photo from Dayo Scuba)

                        • You have to do four dives in all, split between two days, so you'll do two dives per day.  This fourth part you can do within a year of completing the first three classes.  You can do them with your local dive shop, or you can go on your vacation and have the dude at the equipment rental place in Jamaica or wherever you're going do the open water dives with you to complete your certification. 
                        • Once that's done, you'll get your card with your photo on it, and you can scuba scuba scuba to your heart's content.

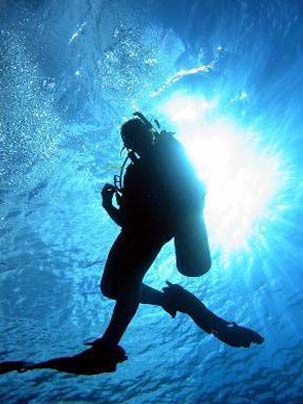
                        This could be you.
                        (Photo of scuba diver in Bunaken National Park, Indonesia, from Scuba Diving in the World)


                        Sources
                        PADI site
                        The Scuba Guide, Scuba Certification
                        Nicholas McLaren, About.com, Scuba Diving Certification Agencies
                        Aquaviews, A Scuba Divers Diet Questions Answered
                        Scubadoc, Nutrition and Scuba Diving